How to configure a custom email address?
This article explains the process of setting up or changing a custom email address in Jobrock. Jobrock sends out automated messages towards contacts (for example invites, confirmations, reminders for appointments or automations). By adding a custom email address to Jobrock the above communication will be send from a custom domain email address.
| IN THIS ARTICLE |
|---|
| Where to configure a custom email address? |
| Select custom email relay solution |
| Verify and save SMTP email configuration |
| Troubleshooting |
Where to configure the custom email address?
Go to the Email configuration screen in the Jobrock admin module via Admin > Branding > Email.

Select a custom email relay solution
There are three relay solutions available to configure a custom email address in Jobrock.

-
SMTP relay solution
SMTP is the most common solution. Using SMTP as a relay solution requires some extra details besides the actual email address. Click here to continue the SMTP relay configuration.
-
Mailgun relay solution
When your company uses Mailgun, it is also possible to use Mailgun as an email relay solution in Jobrock. Therefore the domain and the email address are required. Click here to continue the Mailgun relay configuration.
-
Office 365 (OAuth2)
OAuth2 is a secure authentication protocol used in conjunction with SMTP relay for Office 365, ensuring that only authorized users can access and send emails through the relay system. This additional layer of security enhances the protection of sensitive email communication within the Office 365 environment. Click here to continue the Office 365 OAuth2 relay configuration.
-
Gmail (OAuth2)
Gmail OAuth2 is a robust authentication protocol designed to work with SMTP relay for Gmail, providing security measures to allow only authorized users to access and send emails through the relay system. By implementing OAuth2, Gmail ensures heightened protection for sensitive email communications, bolstering the security framework within its environment. Click here to proceed with the Gmail OAuth2 relay configuration.
TIP: For both email relay solutions access to the domain or access to the SMTP hosting details are required. Ask your domain or email administrator if needed!
SMTP Relay solution configuration
Step 1: SMTP relay solution
Select the SMTP radio button as relay solution.

Step 2: Mandatory fields
Provide the correct values for the mandatory fields:
- SMTP hostname
- Encryption type (SSL, TLS or none)
- SMTP port
- Email address
Example for Microsoft Office 365 email accounts:
SMTP hostname: smtp.office365.com
Encryption type: TLS
SMTP port: 587
Email address: no-reply@yourdomain.com or notification@yourdomain.com etc.
Step 3: Authentication
Add authentication if required. Most email accounts will require an authentication.
Therefore the following fields are required:
- SMTP user name
- SMTP password
Step 4: Display name
Enter the display name you want to use. The display name is not a mandatory field. With this field a name (your company name) can be specified in other to use as sender of the outgoing mail instead of the email address itself.

Step 5: Configuration test
Click here to go to the last step to verify and save the configuration.
Mailgun relay solution configuration
Step 1: Mailgun relay solution
Select the Mailgun radio button as relay solution.

Step 2: Mandatory fields
Provide the correct values for the mandatory fields
- Domain
- Email address

Step 3: Save configuration
Click the Save button to submit the details
Step 4: Domain administrator instructions
Send the presented instructions to your domain administrator.
Several instructions will appear. Send these instructions to the domain administrator.
In total, the domain administrator should add 3 DNS records (1 x CNAME, 2 x TXT).

NOTE: It can take up to 24 hours after updating the DNS records for the email address to be operational.
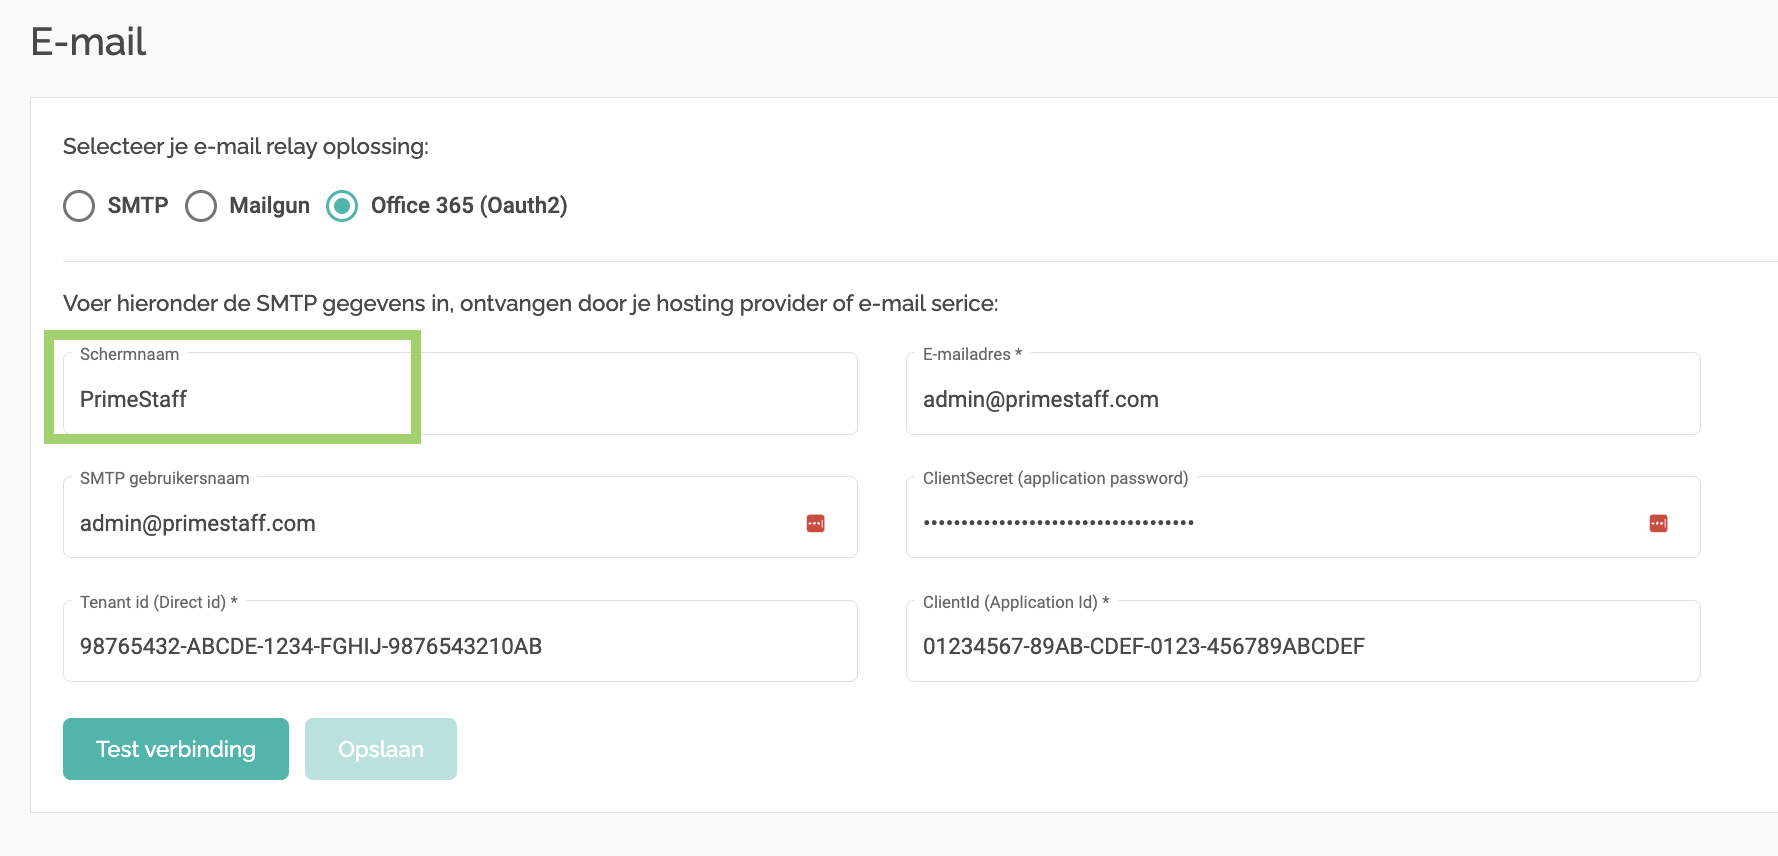
Office 365 (OAuth2) relay solution configuration
Step 1: Office 365 relay solution
Select the Office 365 radio button as the relay solution

Step 2: Mandatory fields
Provide the correct values for the mandatory fields:
- Email address
- SMTP username
- ClientSecret
- Tenant ID
- Client ID
Example for Microsoft Office 365 email accounts:
Email address: no-reply@yourdomain.com or notification@yourdomain.com etc.
SMTP username: no-reply@yourdomain.com
ClientSecret: AbCdEfGhIjKlMnOpQrStUvWxYz1234567890
Tenant ID: 98765432-ABCDE-1234-FGHIJ-9876543210AB
Client ID: 01234567-89AB-CDEF-0123-456789ABCDEF
READ MORE: Please note that the ClientSecret, Tenant ID, and Client ID are specific to your Azure AD application registration, which you need to set up in the Azure portal before configuring SMTP relay with OAuth2 for Office 365.
You can find detailed instructions on configuring and generating the required settings here.
Step 3: Display name
Input the desired display name. While this field is not mandatory, specifying a display name (such as your company name) allows you to use it as the sender of outgoing mail, instead of the email address itself.
Gmail (OAuth2) relay solution configuration
Step 1: Gmail relay solution
Select the Gmail radio button as the relay solution

Step 2: Mandatory fields
Provide the correct values for the mandatory fields:
- Email address
- SMTP username
- Private Key
- Client Email
Example for Gmail email accounts:
Email address: no-reply@yourdomain.com or notification@yourdomain.com etc.
SMTP username: no-reply@yourdomain.com
Private Key: -----BEGIN PRIVATE KEY-----xxxxxxxxxxxxxxxxxxxxxxx-----END PRIVATE KEY-----\n
Client Email: send-email-service@send-emails-415216.iam.gserviceaccount.com
READ MORE: Please note that the Private Key and Client Email are specific to your Gmail application configuration, which you need to set up in the Google API Console portal before configuring SMTP relay with OAuth2.
You can find detailed instructions on configuring and generating the required settings here.
Step 3: Display name
Input the desired display name. While this field is not mandatory, specifying a display name (such as your company name) allows you to use it as the sender of outgoing mail, instead of the email address itself.

Verify and save email configuration
Once all the above steps have been processed it is time to verify the configured email by testing and accordingly saving the configuration. Follow the steps below in order to finalize and start using the custom email address:
Step 1: Test configured email configuration
Click the Test connection button at the bottom to start testing the configured email address.
Step 2: Provide test email address
A pop-up will open. Enter an email address you have access to (for example your own personal email address) an click the Send Email button. The system will now send a test email message to the email you provide using the configured custom email address as sender.

Step 3: Receive a test email
A test email should be received in the inbox of the email address entered in step 2. The sender of the email should be the configured email address.
Step 4: Save custom email configuration
Once succesfully tested in step 3, click the Save button in order to update the system with the provided custom email address configuration.

NOTE: Make sure you save the configuration after testing, otherwise the details will not be stored!
From this moment on the system will use the newly configured custom email address.
Troubleshooting
If the test email is not correctly send or you are facing other difficulties configuring the custom email, please note down the error message you are receiving.
READ MORE: More information about unsuccessful tests of your custom email address? Click here to find out how to solve this.