1.2 SSO user setup
This document covers multiple topics related to the setup of Salesforce and Jobrock integration. In addition to establishing synchronization between user accounts, this document also includes information on setting up Single Sign-On (SSO) for users. Additionally, it provides guidance on assigning roles and permissions to newly created users and verifying the user synchronization configuration.
| Jobrock SSO profile widget |
| Sync Record apex |
| User object mapping |
| Jobrock admin user promotion |
| Associate brands with User profiles for multi-brand orgs |
| Verify user synchronization |
Jobrock SSO profile widget
To activate Jobrock user accounts, users can use the Jobrock Single Sign-On (SSO) profile widget.
TIP: We recommend positioning this widget in a prominent location in Salesforce for easy access.
Follow the chapters below to add the Jobrock SSO profile widget and instruct users to create their Jobrock account using this Jobrock SSO profile widget.
Adding the Jobrock profile widget
Step 1: Navigate to the Salesforce page
Navigate to the page in Salesforce where the Jobrock SSO profile widget needs to be added.
Step 2: Edit the Salesforce page
Click the Edit page button on the page the profile widget needs to be added.
Step 3: Search for the Jobrock SSO profile widget
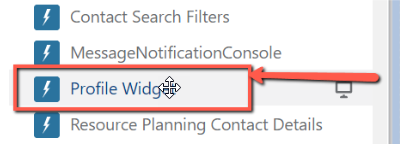
Under components and custom widgets, search for a widget called "Profile widget".
Step 4: Select the profile widget
Click the Profile widget to install it on the selected page.
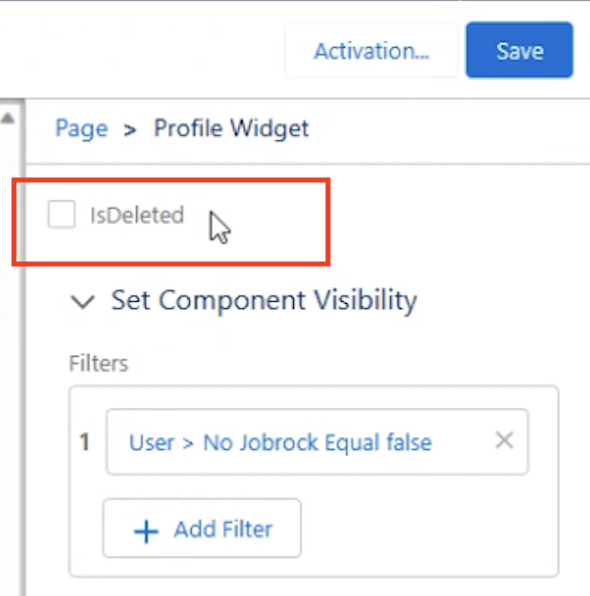
NOTE: Make sure that the checkbox "IsDeleted" is unchecked in the Profile Widget.
Jobrock account activation
Now the Jobrock profile widget has been added, users can be instructed to activate their Jobrock user account by using the profile widget in Salesforce.
Follow the steps below to instruct the users:
Step 1: Go to the Jobrock profile widget in Salesforce
The user needs to know where in Salesforce to find the Jobrock profile widget.
This all depends on where it was positioned
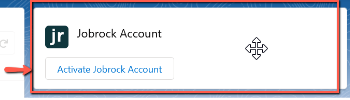
Step 2: Activate the Jobrock user account
For new users, the Jobrock profile widget will show an Activate Jobrock account button.
Step 3: Verification
Jobrock will now ask users for one-time permission to use the Salesforce user credentials and details. After giving this one-time consent, the Jobrock user account is created and the user can now access all Jobrock features (within their permission setting), without the need to log in every time.
Step 4: Activated Jobrock user account
Once the verification in step 3 is done, the widget will look as follows and the profile information of the user will be shown:

Sync Record apex
The Sync Record Apex class is available to synchronize user records between Salesforce and Jobrock. By executing the Sync Record Apex class, changes made to user records in one system can be updated in the other. This ensures that user profile data remains consistent and up-to-date across both platforms.
Additionally, the user sync apex class can be configured to trigger on specific moments, allowing you to synchronize a user profile when desired. This provides greater control over when user profile updates are synchronized.
| Action Name | Sync Records | Required |
|---|---|---|
| Apex Class | Sync Records | Required |
| JR Object Type | User | Required |
| RecordId | Record id | Required |
| Action | Active, InActive, Delete | Required |
NOTE: Ensure to never pass the Client code in the apex call. Instead, make sure to correctly set up the brand field on the user object in the parent brand.

Recommended user apex class triggers
There are 2 recommended triggers for this user apex class:
A. When a Salesforce user object is updated
B. When a Salesforce user object is deleted
NOTE: To delete a Salesforce user from Jobrock, send the variable IsDeleted = true in the Apex class.
User object mapping
Follow the steps below to obtain the correct user object mapping:
Step 1: Jobrock admin login
Login to Jobrock via accounts.jobrock.com with the admin user (Jobrock provided credentials during the client creation process).
Step 2: User object settings
Go to the ATS object settings in the Jobrock admin module via Admin > Integrations > ATS > ATS Object and select the User object.

Step 3: Select the Salesforce object name
On top of the table, you will find the Jobrock object name (user) and next to that the Salesforce object name. Select the corresponding Salesforce object name from the pick list.

Step 4: Select Salesforce field names
Select the corresponding Salesforce field name from the drop-down lists for each Jobrock field name in the table.

Step 5: Enable push & pull synchronization
To enable Push & Pull synchronization between Salesforce and Jobrock, it is recommended that all required fields be synchronized to both systems. This ensures that data remains consistent and up-to-date across both platforms.
At a minimum, basic information such as first name, last name, phone, team, user ID, username, and brand (in case of a multi-brand setup) should be synchronized by default. This will ensure the most essential information between the two systems is kept up-to-date.
Jobrock admin user promotion
The initial Jobrock admin user you received from Jobrock can only be used to log in directly to Jobrock. This user has no function in or connection with Salesforce.
After finishing the above chapters of this document users can create their Jobrock user accounts. When this is done; Jobrock will give these users the basic “user” / “recruiter” role.
Together with the client you can now decide to promote a particular user (this user needs to have an activated Jobrock user account) and give this user more permissions in Jobrock.
To do this, please follow the next steps:
Step 1: Accessing Jobrock with the Jobrock admin user
Login to Jobrock via accounts.jobrock.com and use the credentials you received from Jobrock for your initial Jobrock admin user account.
Step 2: Admin user section
Go to admin (via the main menu bar) and select the “Users” or “Gebruikers” section on the left-hand side.

Step 3: Search or look up the user
Now look up (or search by using the search bar) the user you would like to give admin rights in Jobrock
Step 4: Update user role(s)
Click on the three dots behind the user’s name and select “Beheer gebruikersrol” or “Manage user role”.

Step 5: Assign Jobrock permission sets to SF users
In this section, you will find instructions on how to add and remove Jobrock permission sets for Salesforce users.
- Login to SF
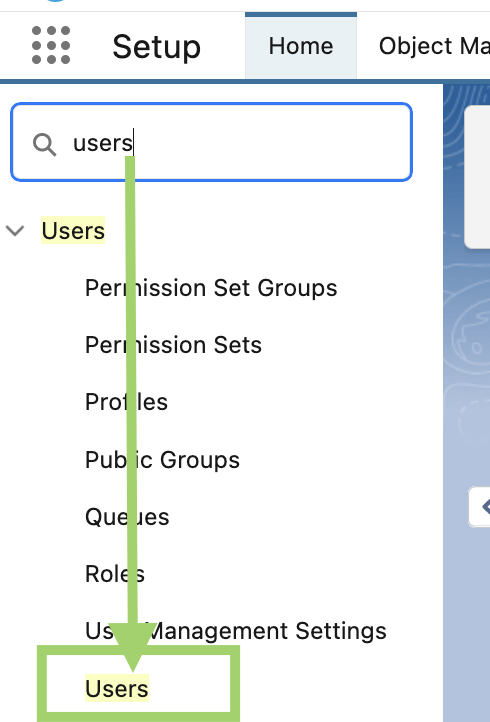
- Go to the Setup page
- Search for users
-
Under users, click on Permission Sets

- Now select the permission sets you want to enable for the user
-
Click on Manage Assignments

-
Click on the “Add assignment” button to move /add the permissions in the Enabled Permission sets

-
Choose user(s) and hit "Next" to assign the permission set

- Optional: you can select an expiration day for the selected user(s)
- Finish the process by clicking on “Assign” at the bottom right of your screen
Step 6: Understanding the Jobrock-Admin and Jobrock-Recruiter Access Permission
There are two permissions available, both are different according to their assigned roles to users.
-
The Jobrock-Admin Access permission set is designed for admin users only. Once assigned in Salesforce, this permission set grants access to modify Jobrock field mappings and configurations, as well as access to Jobrock widgets, Apex classes, and other related tools.
- The Jobrock-Recruiter Access permission set is intended for recruiter users. When assigned, it grants Salesforce users access to Jobrock widgets and Apex classes related to normal recruiting flows, while preventing them from modifying field mappings or configurations.

It’s important to assign the correct JR permission set to each user. For recruiters, you can assign them the “Jobrock - Recruiter Access” permission set. For admins, you can assign them to the “Jobrock - Admin Access” permission set in Salesforce.
Associate brands with User profiles for multi-brand orgs
Salesforce admins can associate brands with user profiles via de following steps:
Step 1: Go to Salesforce
Go to the setup page in Salesforce and find "Users".
Step 2: Select and edit a User profile
In the list of "All Users", select the relevant user to edit it.
Step 3: Assign brand(s) to the user
In the "Additional Information" section, select one or multiple brands that the user should be granted access to.
Step 4: Save changes
Save the configuration by clicking "Save" at the bottom of the page.
For further information on multi-brand setup and its importance, refer to the documentation here.
Verify user synchronization
A correct user object synchronization has been set up when:
- Salesforce users are shown in the list of Jobrock users with their assigned roles.
- The Jobrock profile widget in Salesforce is showing profile details and contains the “Go to account” link.
- A user is deleted in Salesforce -> it will disappear from the Jobrock user list.
- When a profile is updated in Salesforce -> changes should reflect in Jobrock.