5.1 WhatsApp widget
This document describes how to correctly configure WhatsApp mapping and synchronization between Salesforce and Jobrock.
Salesforce custom settings
Create custom fields on the Activity object
As a prerequisite for WhatsApp configuration, add the following custom fields in the activity object and include them in the “Task” layout.
| Custom field name | Object | Name |
|---|---|---|
| OpenWhatsAppConversationUntilDate | Activity | DateTime |
| HasUnreadWhatsAppMessages | Activity | Checkbox |
| ConversationLatestMessageField | Activity | Text(255 characters) |
Next, the following additional fields need to be created in case of a multi-branded client setup
| Custom field name | Object | Name |
|---|---|---|
| ConversationBrandField | Activity | Text(255 characters) |
Add new value in picklist Type
Jobrock is mapping its “Conversation” object with the Salesforce standard “Task” object. To achieve this an additional value needs to be added in the task object.
| Field name | Object | Picklist value to be added |
|---|---|---|
| Type | Task | JR WhatsApp |
Jobrock configuration
Conversation mapping
The Salesforce admin of the client needs to navigate to the Jobrock admin section and follow the following steps:
Step 1: Navigate to “Integrations”-> “ATS” -> “Conversation” object.

Step 2: Field mapping will be populated by default. Make sure to check all the mapped fields to ensure they are up to date and that there are no errors displayed.
| JR field name | ATS field name/fixed values | Sync jobrock | Sync external | Remarks |
|---|---|---|---|---|
| Contact Field | WhoId | Yes | Yes | Standard field |
| Conversation Date Field | OpenWhatsAppConversationUntilDate__c | Yes | Yes | Custom field created in the previous section |
| Conversation Latest Message Field | ConversationLatestMessageField__c | Yes | Yes | Custom field created in the previous section |
| Conversation object name | Task | Yes | Yes | Standard object |
| Conversation Owner Field | OwnerId | Yes | Yes | Standard field |
| Conversation Unread Message Field | HasUnreadWhatsAppMessages__c | Yes | Yes | Custom field created in the previous section |
| Default Closed Status | Completed | Yes | Yes | Standard field, fixed value |
| Default Open Status | Not Started | Yes | Yes | Standard field, fixed value |
| Default Origin | JR WhatsApp | Yes | Yes | Custom picklist value added in the previous section |
| Default Priority | Medium | Yes | Yes | Standard field, fixed value |
| Description Field | Description | Yes | Yes | Standard field |
| Origin Field | Type | Yes | Yes | Standard field |
| Priority Field | Priority | Yes | Yes | Standard field |
| Status Field | Status | Yes | Yes | Standard field |
| Subject Field | Subject | Yes | Yes | Standard field |
| Conversation Brand Field | ConversationBrandField__c | Yes | Yes |
Custom field created in the previous section ** Required in case of multi-brand setup only |
Note: It is required for a Salesforce admin to “Submit” the changes to save the configuration and click the “Verify” button to validate the configuration. In case there is an issue, you will see a message about the misconfiguration of the fields and mapping.

Salesforce WhatsApp widget configuration
Add the WhatsApp widget to a Contact page
Now that you have created all the necessary custom fields for WhatsApp configuration, it's time to add the WhatsApp widget to the contact page.
Step 1: Navigate to a Contact page -> Setup -> Edit page
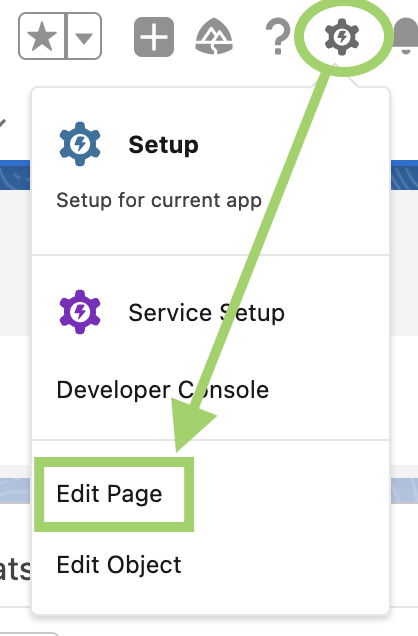
Step 2: Search for “Whatsapp Widget”
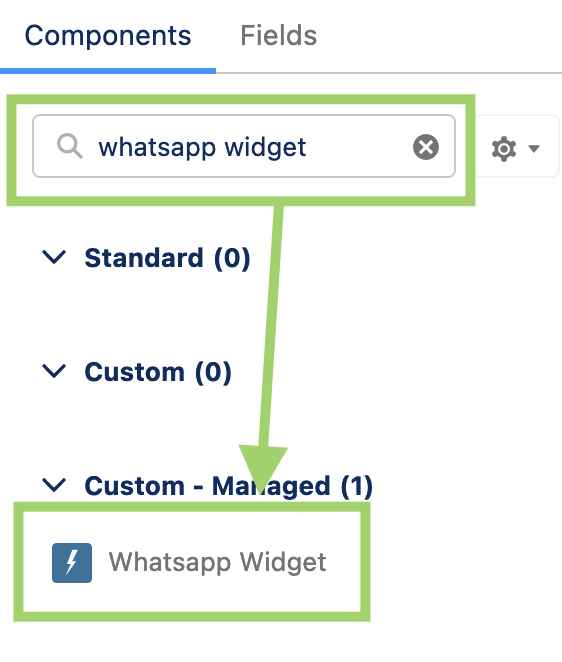
Note: do not select the “Whatsapp Chat Widget”
Step 3: Add to the page
Step 4: Hit “Save”
Configure WhatsApp widget fields
To correctly configure the WhatsApp widget on the contact page in Salesforce, you'll need to populate the Phone Field.
Step 1: Open the WhatsApp Widget you just created on the contact object page.
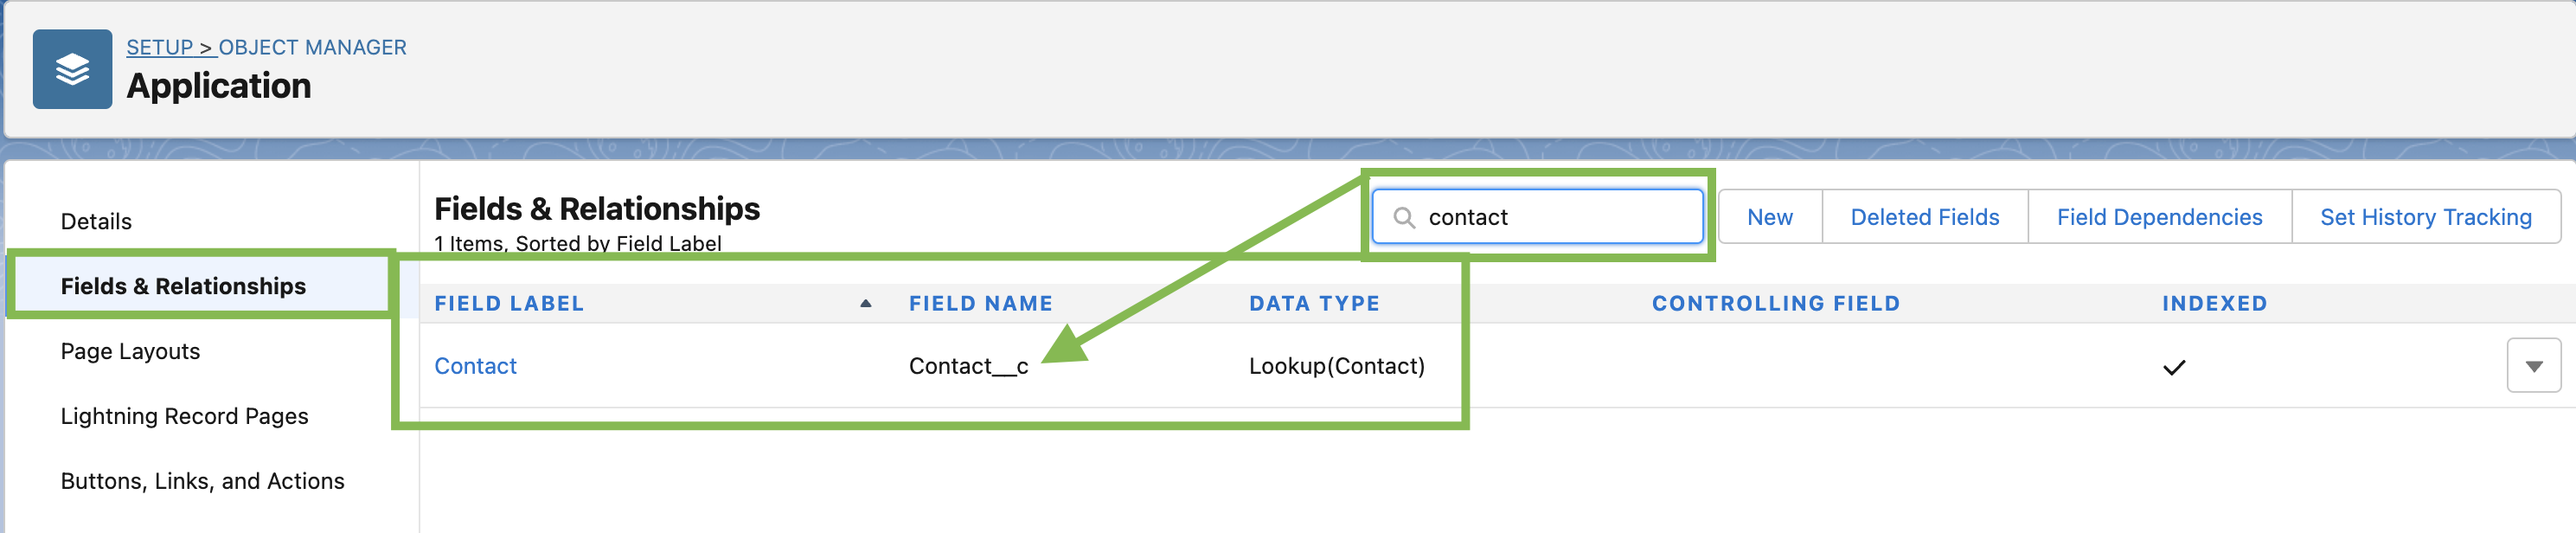
Step 2: Go to the Object Manager -> Contact object -> Field and relationships and identify what field label contains the mobile phone number.

Step 3: Copy the value of the 'Field name' to the "Phone Field" in the WhatsApp widget. In this example, the API field name is MobilePhone.

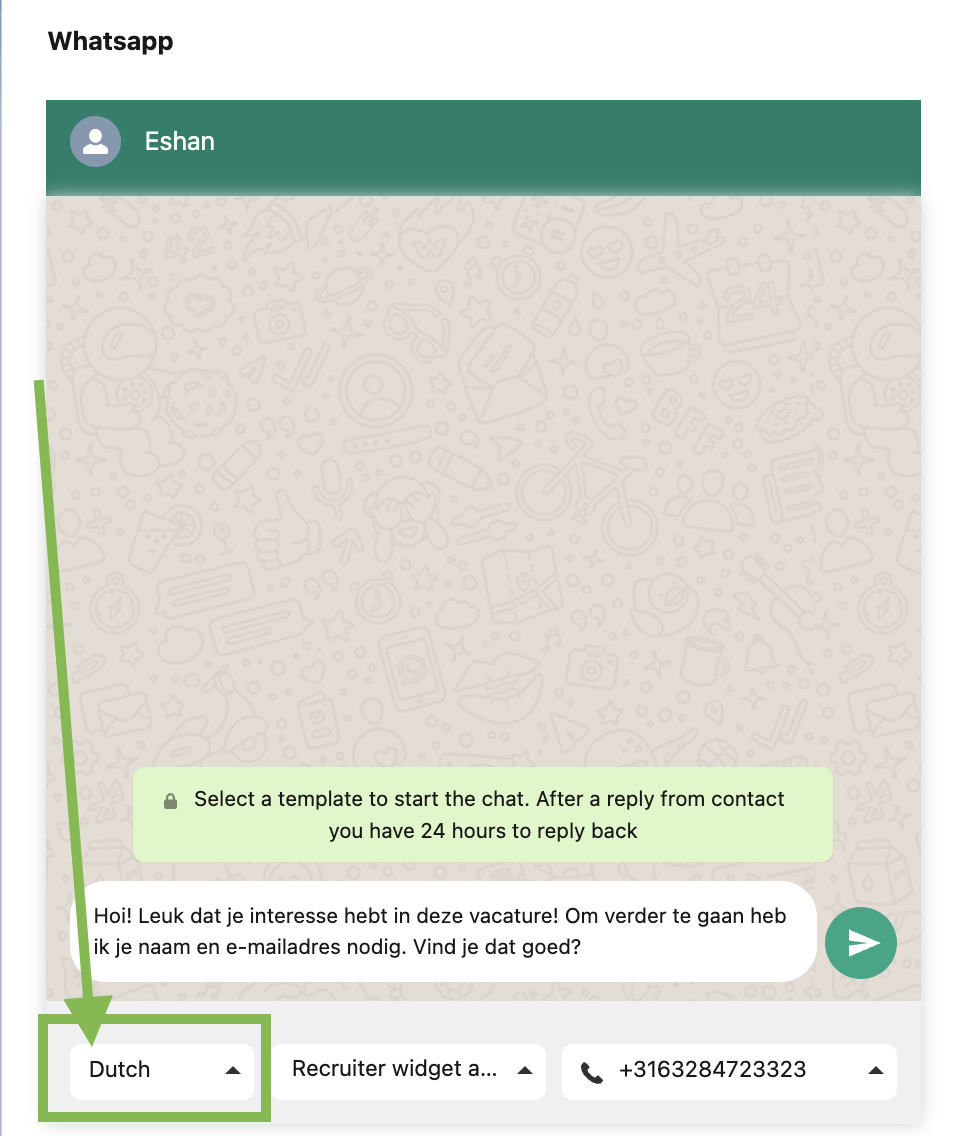
Step 4 (optional): Enter a country value that is most relevant to your organization.
TIP: It is recommended to include the default language in the widget configuration. In the case of Dutch configuration, the value should be set to "nl". This ensures that Dutch templates will be displayed by default for all users in Salesforce, eliminating the need for them to manually select the language from the dropdown in the widget each time.
READ MORE: Brand Field is recommended to populate in case of multi-brand. You can find more information about multi-brand here.
| WhatsApp Widget field name | Values | Mandatory | Remarks |
|---|---|---|---|
| Phone Field | MobilePhone | Yes | Field API name where contact mobile number is saved. |
| Other Phone Fields |
|
No | Fields API name where mobile numbers can be saved (you can specify multiple names, comma separated). |
| WhoId Field |
|
No | Not used. |
| WhatId Field |
|
No | Not used. |
| Brand Field | Brand field API name | No | ** In case of multi-brand setup. To show a brand as selected in the chat window, you need to define this field. |
| Default Template Id |
|
No | Name of the template approved by Meta (do not use display name). This template will be pre-filled by default for the communication. However, you can choose a different template when needed. |
| Default Template Language | NL | No | Some examples of possible values are "nl", "en", and "de". |
Add WhatsApp widget in the Contact in workflow
In case you want to embed the WhatsApp widget on the “contact in workflow” page and link this candidate with the WhatsApp conversation of its contact, you will need to configure the following steps:
Step 1: Navigate to a Contact in Workflow/ lead page -> Setup -> Edit page
Step 2: Search for “Whatsapp Widget”
Note: do not select the “Whatsapp Chat Widget”
Step 3: Add to the page
Step 4: Hit “Save”
Configure WhatsApp widget fields
To correctly configure the WhatsApp widget on the contact in workflow page in Salesforce, you'll need to populate the widget fields:
Step 1: Open the WhatsApp Widget you just created on the contact object page.
Step 2: Go to the Object Manager -> Contact object -> Field and relationships and identify what field label contains the mobile phone number.
Step 3: Copy the value of the 'Field name' to the "Phone Field" in the WhatsApp widget. In this example, the field name for MobilePhone.
You need to set up a relational field because we want to fetch the phone number field from the contact object, thus we'll add it as "Contact__r.MobilePhone" in this example.
Step 4: Go to the Object Manager -> Contact in workflow object -> Field and relationships and identify what field label contains the Contact field.
Step 5 (optional): Copy and paste the Contact field API name in the "WhoId Field". In this example, the API name is "Contact__c".
TIP: It is recommended to populate the 'WhoId Field' on the Contact in workflow page. This ensures that all conversations are synchronized and visible in both the widgets on the Contact page and the Contact in workflow page.
If the 'WhoId' is not populated, conversations on the Contact in workflow page will not be visible on the Contact page for any candidate.

Step 6 (optional): Enter a country value that is most relevant to your organization.
TIP: It is recommended to include the default language in the widget configuration. In the case of Dutch configuration, the value should be set to "nl". This ensures that Dutch templates will be displayed by default for all users in Salesforce, eliminating the need for them to manually select the language from the dropdown in the widget each time.
| WhatsApp Widget field name | Values | Mandatory | Remarks |
|---|---|---|---|
| Phone Field | MobilePhone | Yes | API name for mobile number field. It could be a formula (text) field type to get the contact object's mobile field. |
| Other Phone Fields |
|
No | Name of the other fields where mobile numbers can be saved (you can specify multiple fields names comma separated). |
| WhoId Field | Contact__c | No | Contact field API name of type “Lookup(Contact)”. |
| WhatId Field |
|
No | Not used |
| Brand Field | Brand field API name | No | ** In case of multi-brand setup. To show a brand as selected in the chat window, you need to define this field. |
| Default Template Id |
|
No | Name of the template approved by Meta (do not use display name). This template will be pre-filled by default for the communication. However, you can choose a different template when needed. |
| Default Template Language | NL | No | Some examples of possible values are "nl", "en", and "de". |
How to configure multi-brand in the JR WhatsApp SF widget
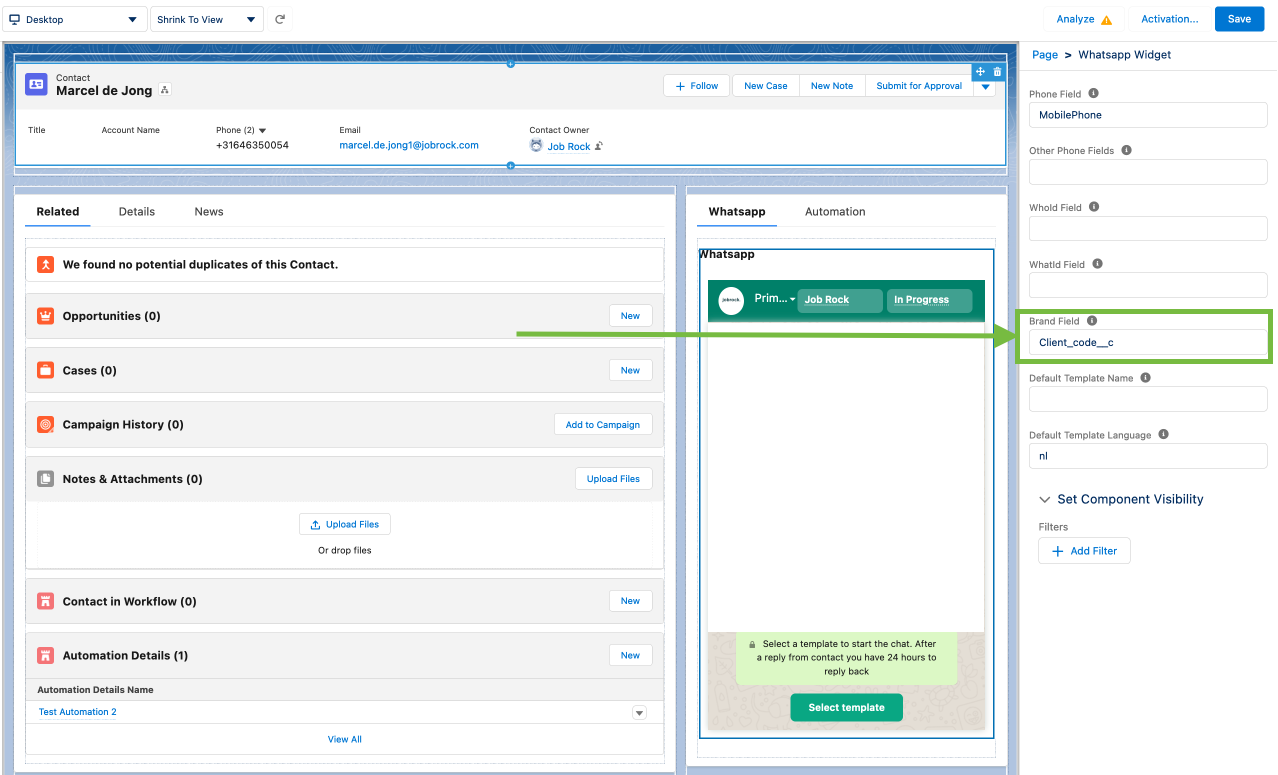
To enable multi-brand setup in the Jobrock WhatsApp widget within Salesforce, you need to configure the "Brand Field" appropriately. Follow the steps below to ensure a seamless multi-brand configuration.
NOTE: The brand label and name of the field are likely to be unique for each client. Note that this may vary.
Step 1: Go to a Salesforce
Go to a contact (in workflow) page in Salesforce.
Step 2: Select “Edit Page”
Click on the gear icon and hit “Edit Page”.
Step 3: Enter the "Brand Field"
Click on the component in the contact (in workflow) page and enter the 'Client code API Name' in the "Brand Field" field. In this example, the "Client_code_c" section is entered.
Step 4: Save the changes
Save the configuration by clicking "Save" at the top right corner.
For further information on multi-brand setup and its importance, refer to the documentation here.
Verification & validation
To ensure the correct configuration and synchronization of WhatsApp and the conversation object between Salesforce and Jobrock, you can follow the steps below:
Enable logs
To enable the WhatsApp logs in the SF dashboard, navigate to the Integration tab and then to the SF dashboard. From there, you can toggle on the option to enable the logs, allowing you to track data synchronization and identify any errors during the process.

Create a test lead
In the next steps, submit a test lead with your WhatsApp number on any test vacancy to verify that the mapping is configured correctly and that messages are sent and received correctly too.
Send WA template at the contact level
Follow the steps below to send a WA template at the contact level:
Step 1: Go to the contact level of your test lead and trigger a WhatsApp template.
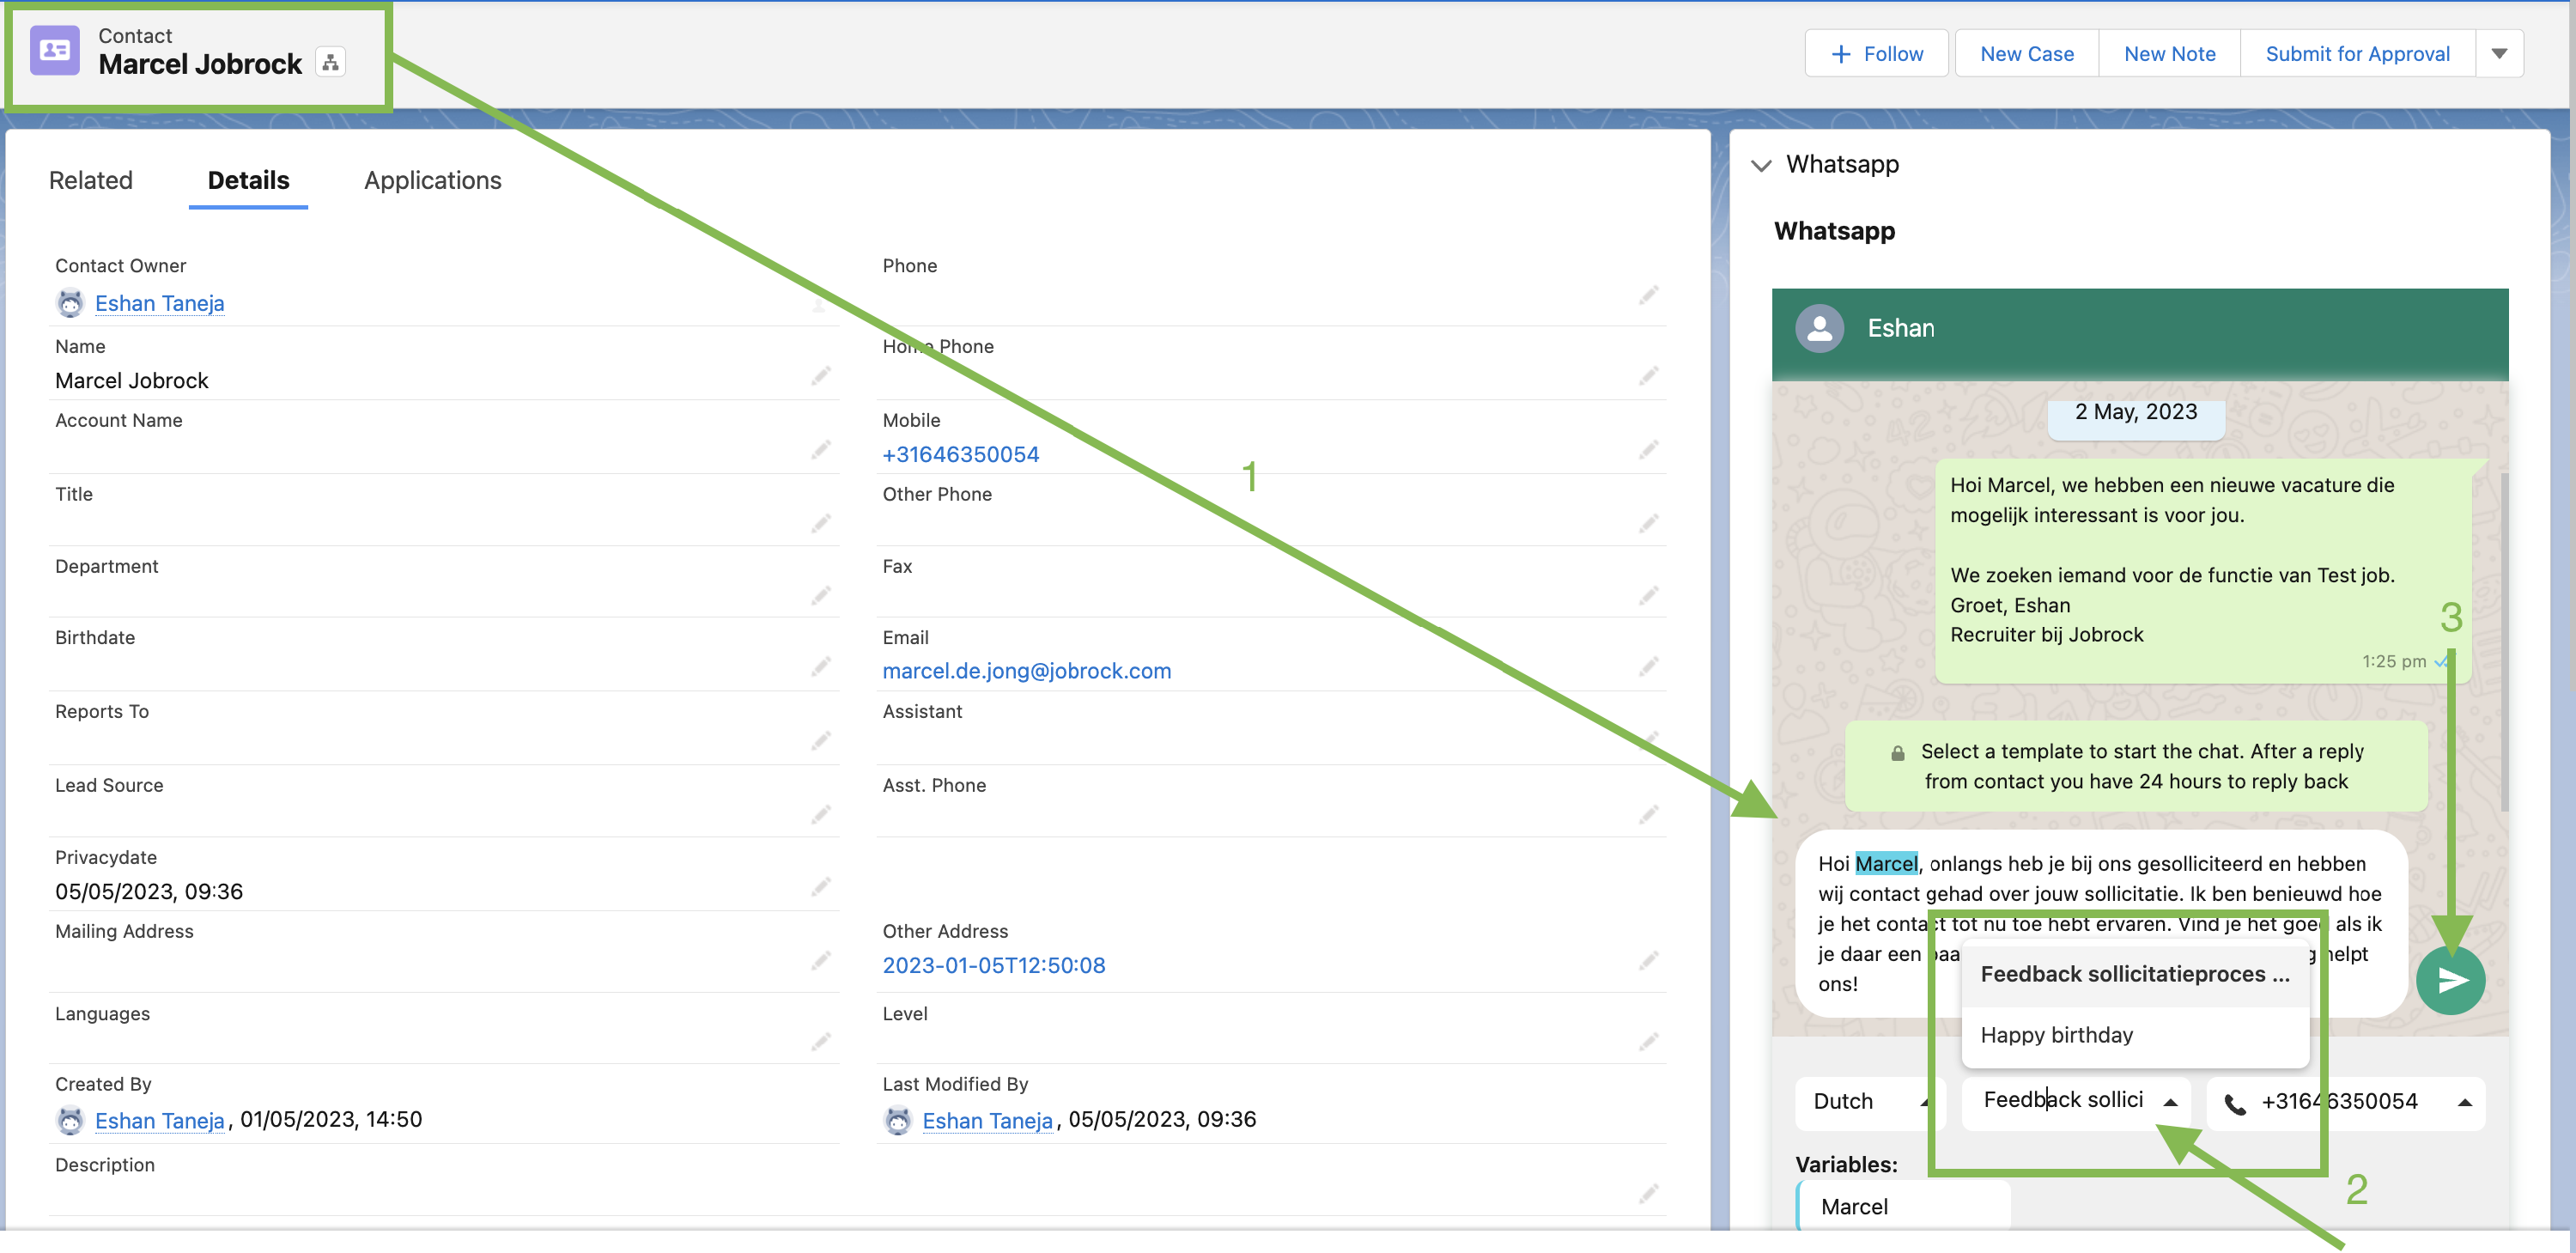
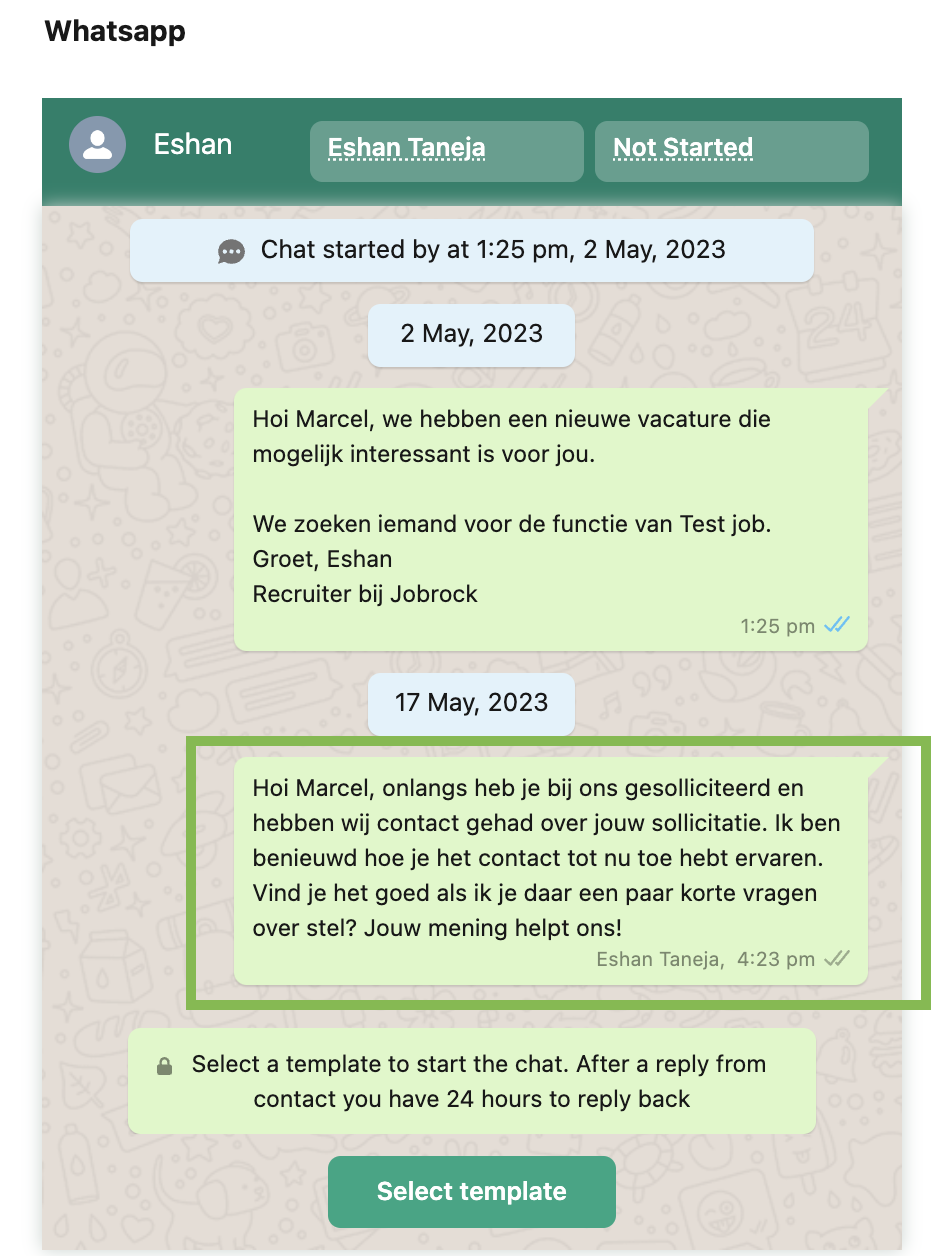
Step 2: Check if the template is sent and if you've received the template on your phone too.
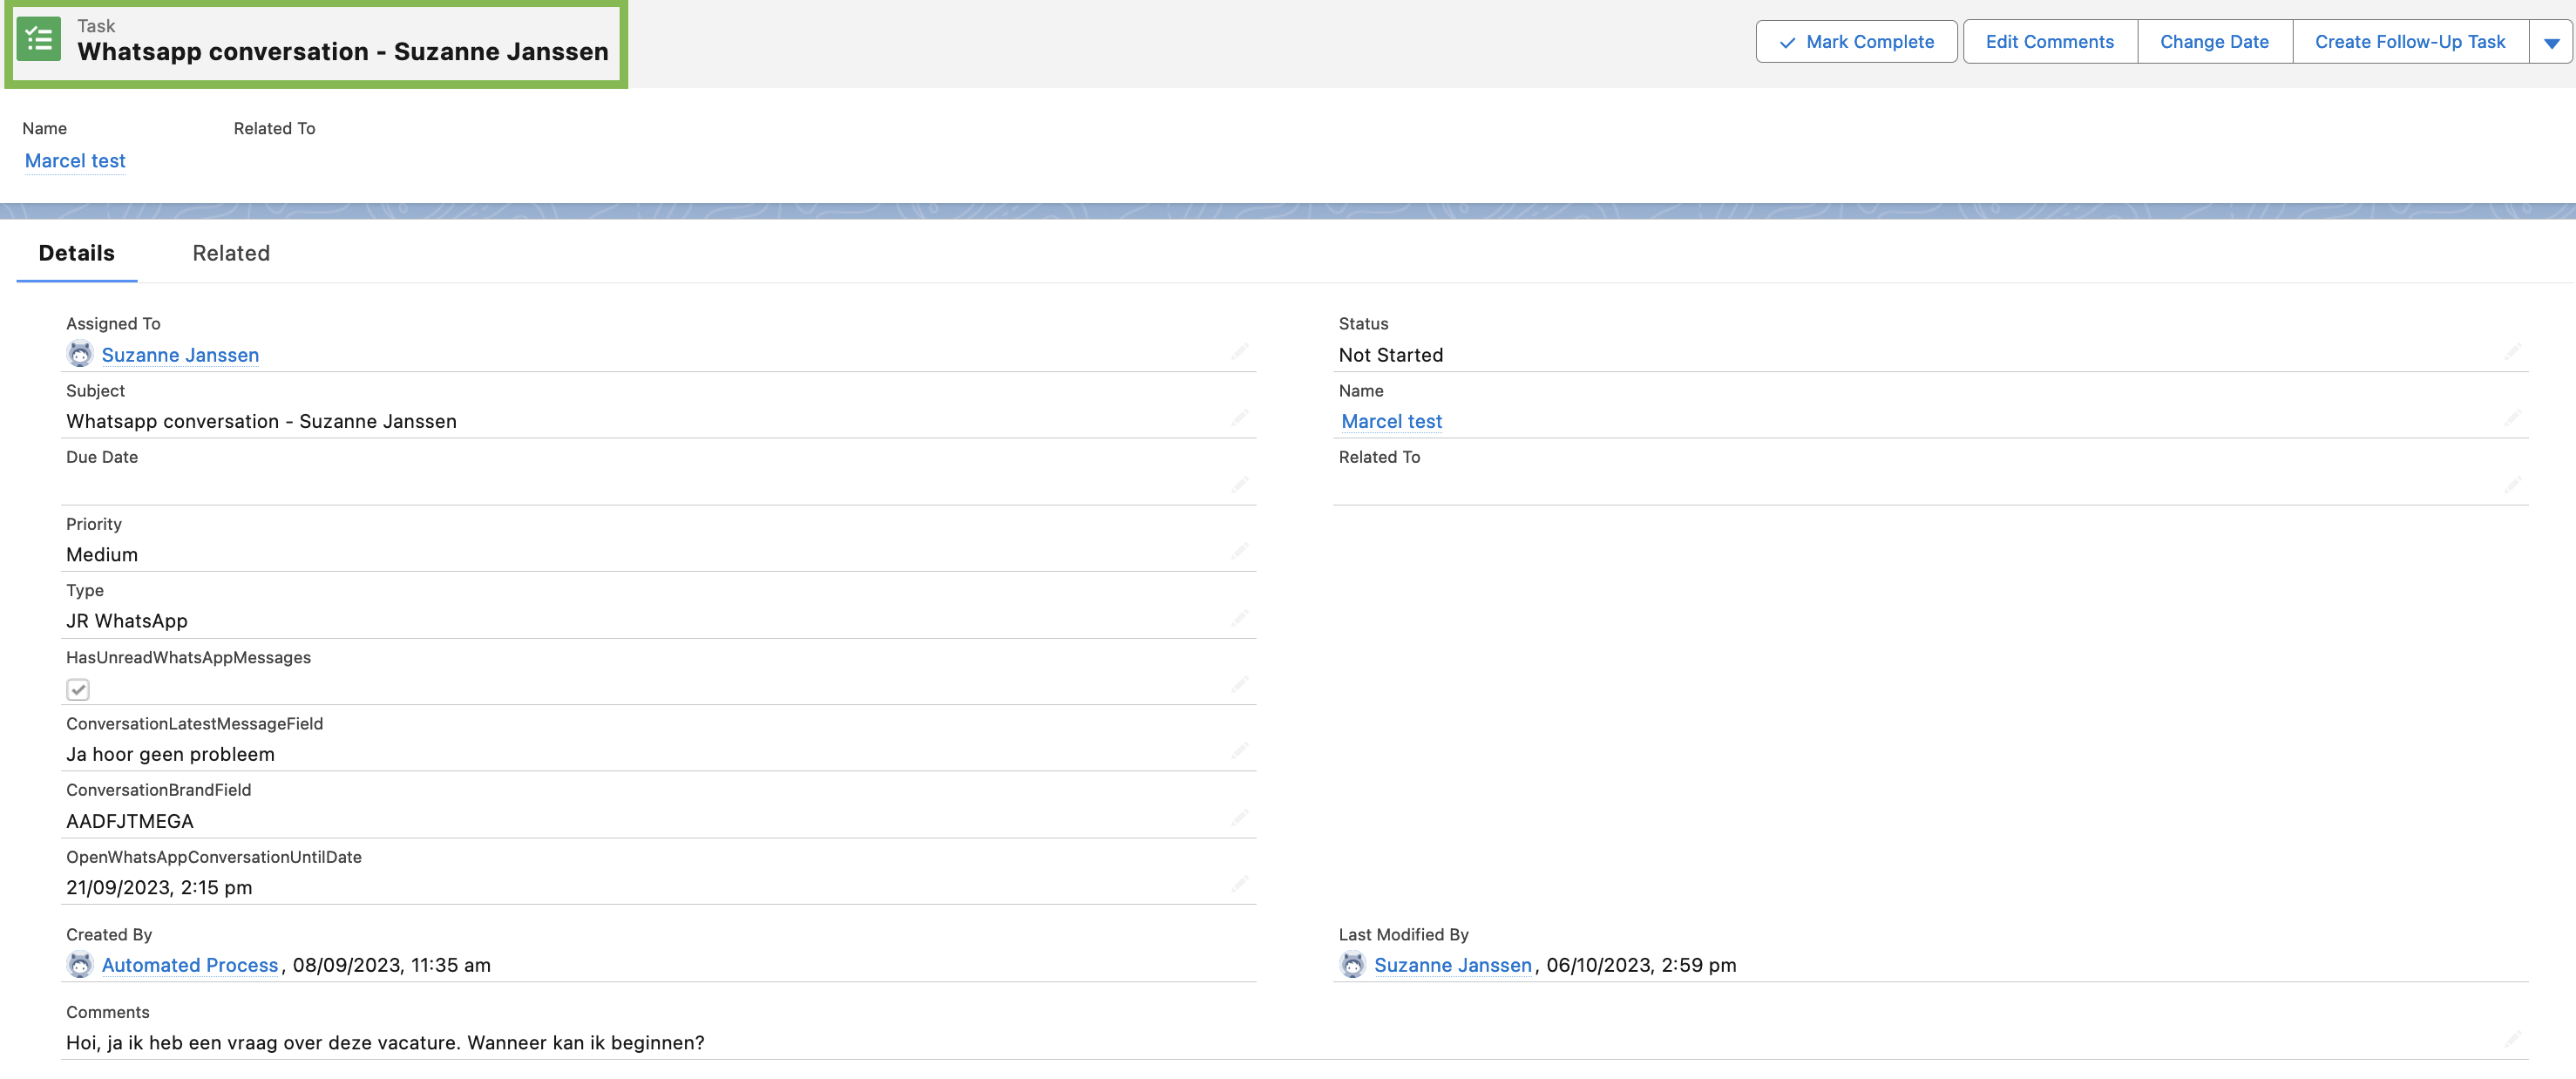
Step 3: Check if the WhatsApp conversation task is created.
Refresh the page and scroll down to the 'Activity' timeline and verify if a Task is created.
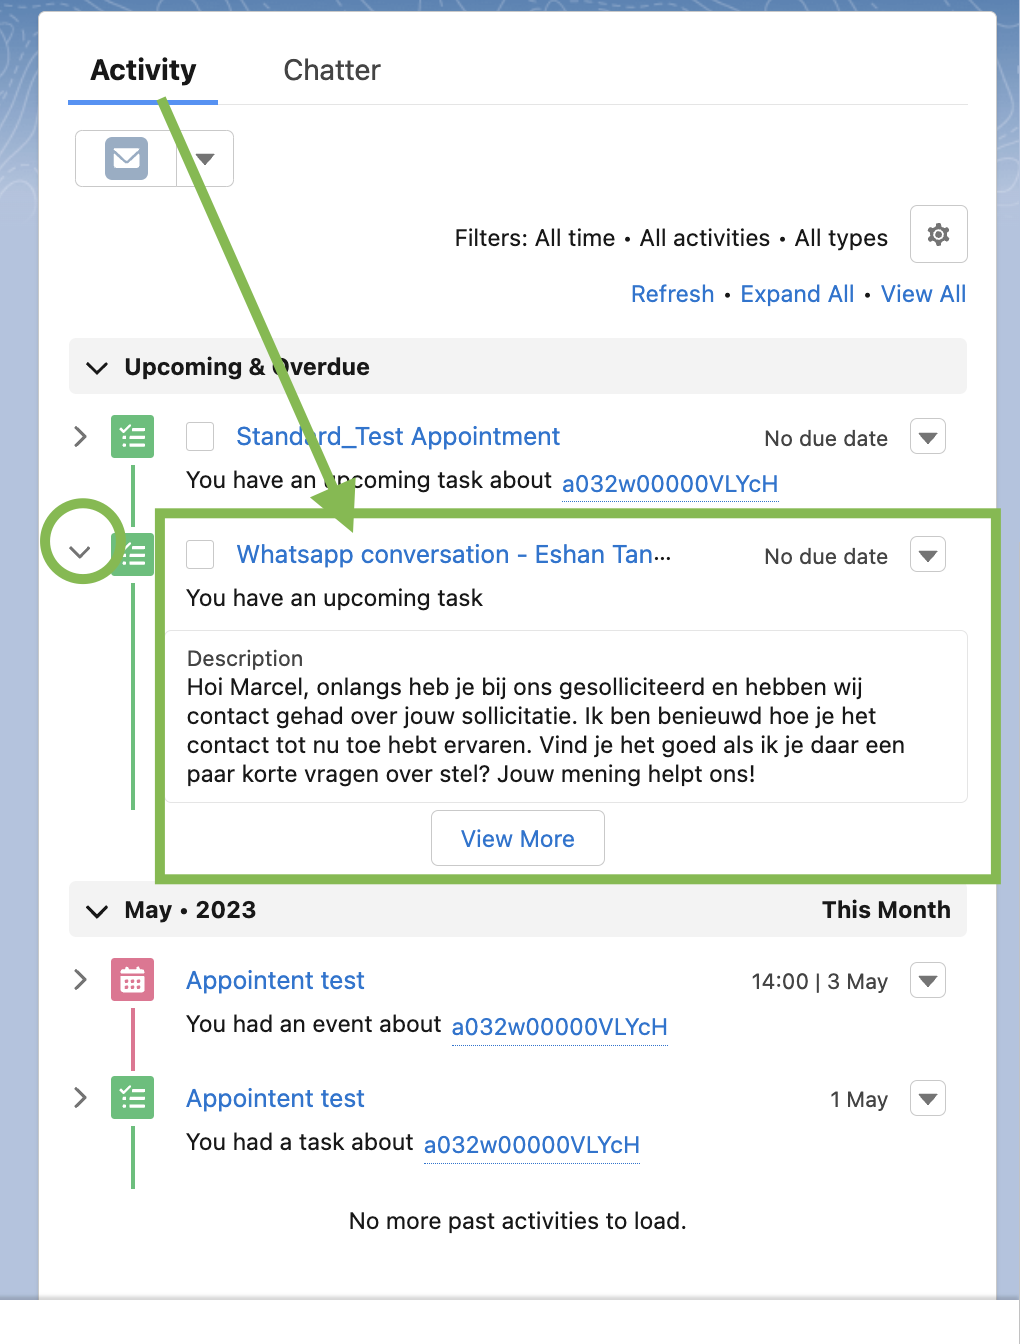
Click on the task to see the details of the WhatsApp conversation record that has been created.
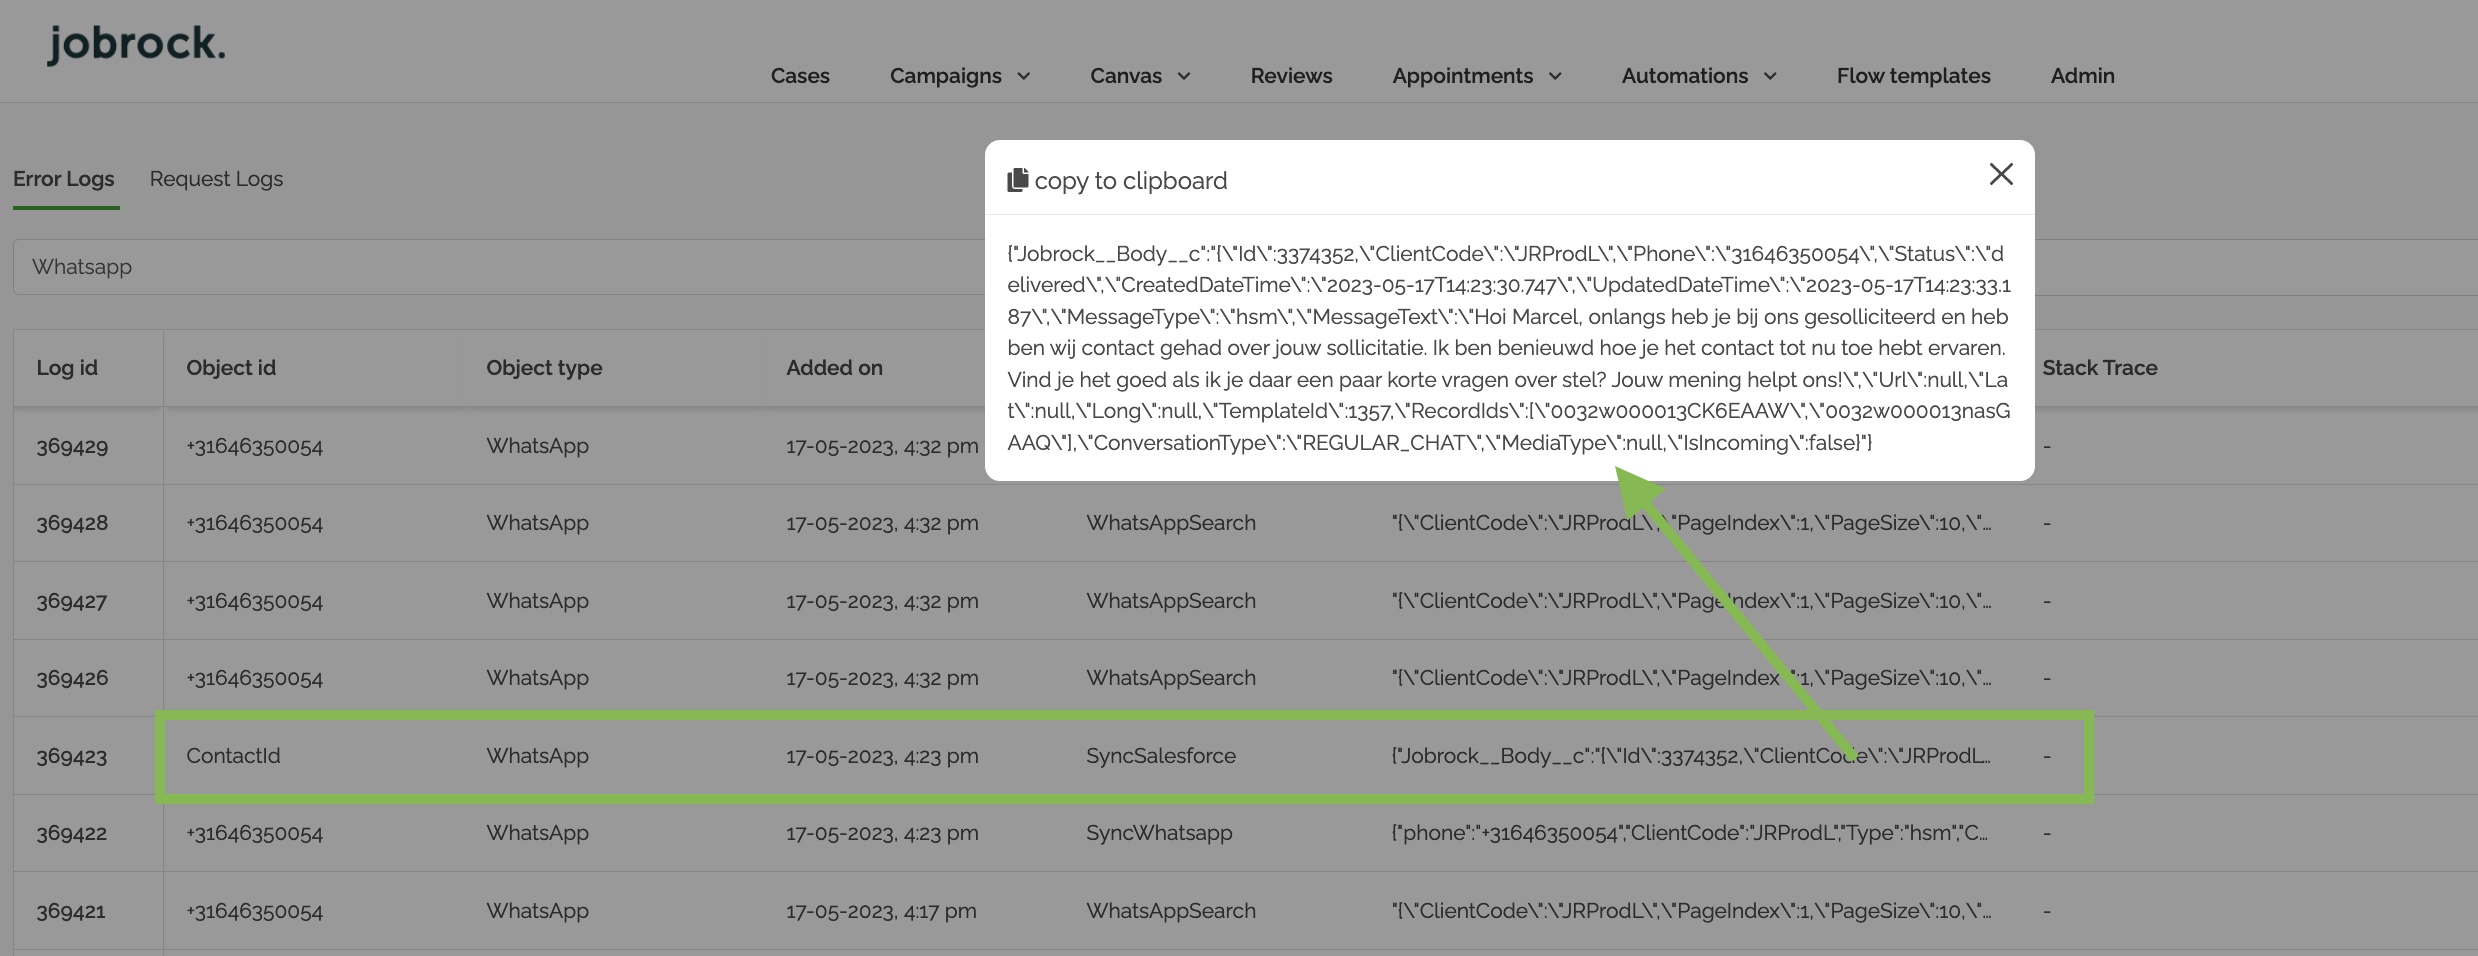
Step 4: Validate the above in the WhatsApp logs within the JR SF dashboard
Navigate to the JR Admin section -> Integraties -> Salesforce dashboard and click Logs in the WhatsApp widget.

Find the log related to your test lead and click on the text in the Object field. The pop-up should display the data with the correct information. If there are no errors displayed, the template has been triggered correctly.
Send WA template at contact in workflow level
To test sending WhatsApp templates at the contact in workflow level, you can follow the same steps as above. In short:
Step 1: Create a test lead and navigate to your test lead on contact in workflow level.
Step 2: Check if the template is triggered correctly in the widget.
Step 3: Verify if the task is created on the activity timeline on the contact object
Step 4: Validate if the logs also contain the correct information.
It's important to verify in this step if the Phone Number field and the WhoId field are configured correctly in the Whatsapp widget on the candidate in workflow page, meaning that the conversations should be synced in both widgets and the Phone Number is correctly fetched from the contact object.
Breaking Changes
We’ll list all the breaking changes of the past in this section for reference.
Deprecated fields
The following fields have been deprecated from the latest package and will not be supported anymore. It is recommended to upgrade to the new package and delete custom fields from the salesforce objects and layouts
Deprecated fields in Salesforce
| Custom field name | Object | Type | Last supported version |
|---|---|---|---|
| HasUnreadWhatsAppMessages | Contact | Boolean/checkbox | 1.35 |
| OpenWhatsAppConversationUntilDate | Contact | Datetime | 1.35 |
Deprecated fields in Jobrock configuration
| JR field name | ATS field name/fixed values | Sync Jobrock | Sync external | Remarks | Last supported version |
|---|---|---|---|---|---|
| enableWhatsAppCase | TRUE | Yes | Yes |
|
1.33 |
| EnableWhatsAppConversation | TRUE | Yes | Yes |
|
1.35 |
| caseObjectName | Task | Yes | Yes |
|
1.33 |
| unreadMessageField | HasUnreadWhatsAppMessages__c | Yes | Yes | Custom field | 1.35 |