7.2 Automation object mapping
Additionally to the automation task mapping you can also (optionally) configure automation object mapping. This document provides a step-by-step guide on how to configured and map automation objects in order to have automation data (including automation questions and answers) in Salesforce.
Creation of the Automation Details object and its fields in Salesforce.
Step 1: Create the Custom Object (Automation details)
-
Navigate to Setup in Salesforce.
In the Quick Find box, search for Objects and select Object Manager.
Click on Create > Custom Object.
Enter the following details:
- Label: Automation Details
- Plural Label: Automation Details
- Object Name: Automation_Details__c
- Description: Stores details of automation jobs.
- Enable Allow Reports and Track Field History as needed.
- Click Save.
-
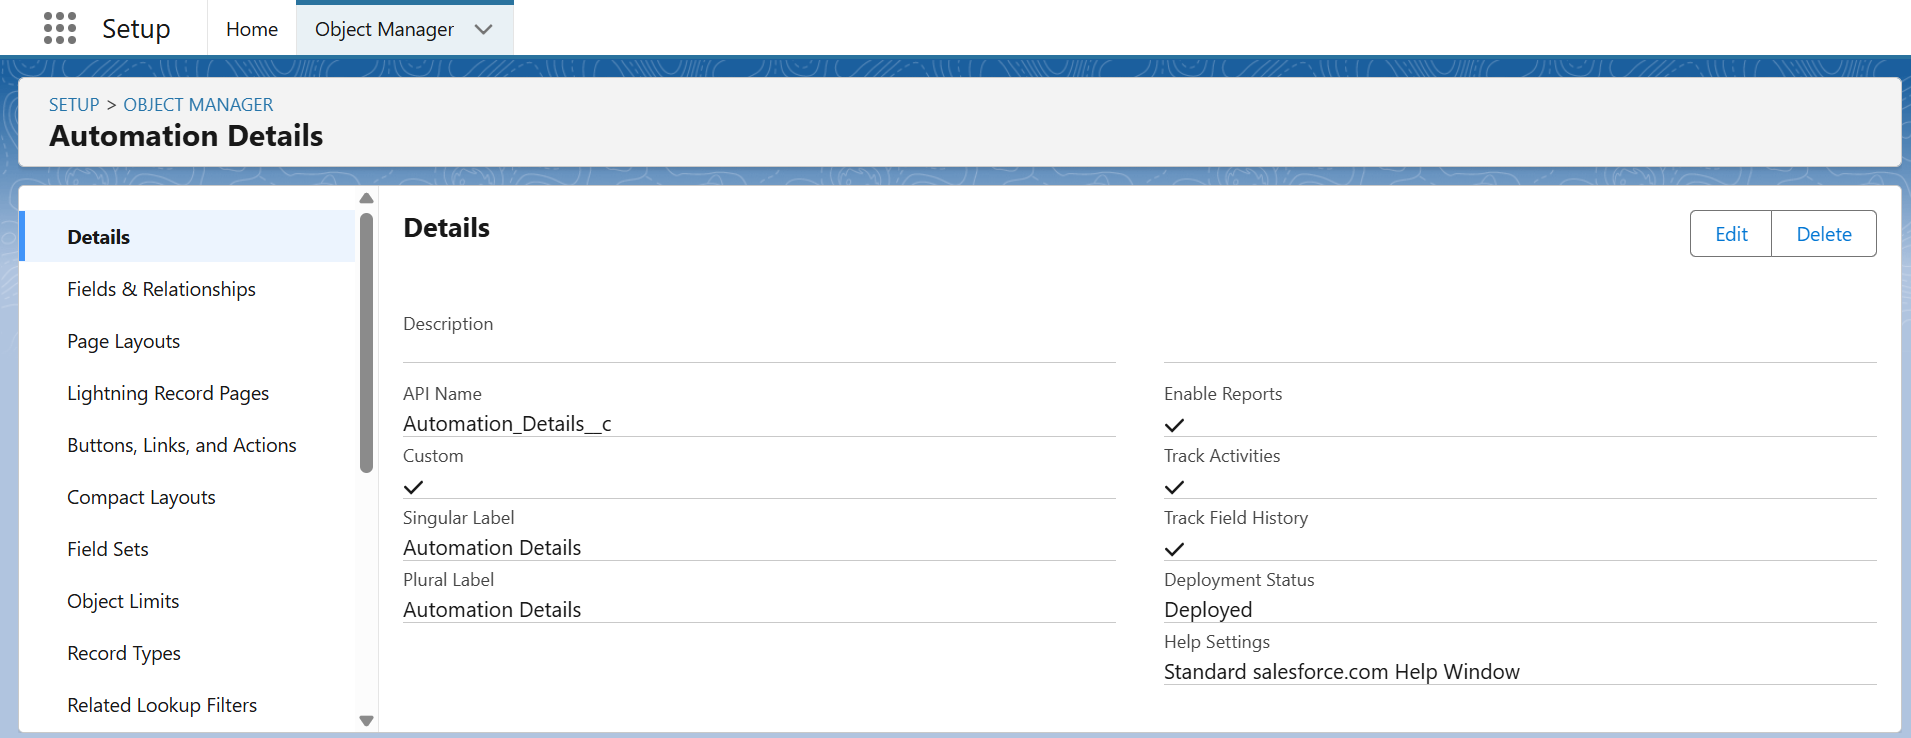
After Creating Object its look like below:

Step 2: Create Standard Fields
These fields will always be present:
- Owner (Lookup to User, Group)
- Created By (Lookup to User)
- Last Modified By (Lookup to User)
- Automation Details Name (Text, 80 characters)
Step 3: Create Custom Fields
Mandatory Fields:
- Automation ID (Text, 255 characters)
- API Name:
Automation_ID__c - Description: ID of the automation (from Jobrock edit mode URL)
-
Required: Yes
JR ID (Long Text Area, 32,768 characters)
- API Name:
JrId__c - Description: Unique ID when an automation is sent to a contact/candidate.
-
Required: Yes
QuestionAnswers (Long Text Area, 70,000 characters)
- API Name:
QuestionAnswers__c - Description: Stores responses related to the automation.
- Required: Yes
- API Name:
Optional Fields:
JR Environment ID (Long Text Area, 50,000 characters)
- API Name:
JRrEnvironmentId_c__c -
Required: No (Only required for multilabel environments)
Record Type (Long Text Area, 50,000 characters)
- API Name:
RecordType__c - Required: No (Not necessary if working with only two objects)
Step 4: Create Lookup Fields
- Job ID (Lookup to Job Object)
-
API Name:
Job_ID__cContact ID (Lookup to Contact Object)
-
API Name:
Contact_whoid__cLead ID (Lookup to Contact in Workflow)
- API Name:
Contact_in_Workflow__c
-
Step 5: Create Date/Time Fields
- Start Date (Date/Time)
-
API Name:
Start_Date__cCreated Date (Date/Time)
-
API Name:
CreatedDate__cComplete Date (Long Text Area, 32,768 characters) (Ensure DateTime format for Jobrock mappings)
- API Name:
Complete_Date__c
-
Step 6: Create Text & Picklist Fields
- Communication Channel (Text, 255 characters)
-
API Name:
communication_channel__cResult (Long Text Area, 50,000 characters)
-
API Name:
Result__cStatus (Long Text Area, 50,000 characters) (Picklist values should match Jobrock API values exactly)
-
API Name:
Status__cSubject (Long Text Area, 50,000 characters)
-
API Name:
Subject__cType (Long Text Area, 50,000 characters)
- API Name:
Type__c
-
Step 7: Configure Page Layouts and Permissions
- Adjust the Page Layout to display important fields prominently.
- Configure Field-Level Security and Profiles to control access.
- Enable necessary permissions for users to create, edit, and view records.
Step 8: Validate and Test
- Create Sample Records to verify field mappings.
- Test Jobrock Integration to confirm proper data syncing.
- Adjust Picklist Values if needed for dynamic updates.
Step 9: After creating all the fields, the Automation Details object looks as follows.

Create automation details page in Salesforce
Step-by-Step Guide to Creating the Automation Details Page in Salesforce -
Step 1: Navigate to Object Manager
- Go to Setup in Salesforce.
- In the Quick Find box, search for Objects and select Object Manager.
- Locate and select Automation Details.
Step 2: Create a Lightning Record Page
- Click on Lightning Record Pages in the left panel.
- Click New and select Record Page.
- Enter the Label as "Automation Details Page".
- Choose Automation Details as the object.
- Select Lightning App Builder and click Next.
Step 3: Design the Page Layout
-
Choose a Page Template (e.g., Header and Left Sidebar or Three Regions).
Click Next and add the following components:
- Record Detail Component (Drag and drop the Record Detail component to display fields).
- Related Lists (Add sections for related Jobs, Contacts, and Leads).
- Tabs Component (To separate sections like Details, Related, and Notes).
- Custom Components (If needed for advanced features like status updates or automation logs).
- Click Save.
Step 4: Assign the Page as Default
-
Click Activate after saving.
Choose where this page should be assigned:
- Org Default (For all users).
- App Default (For a specific app like Sales or Service Console).
- Profile-Based Assignment (For specific user profiles).
- Click Save and Activate.
Step 5 : After creating the page, it looks like this.
Step 6: Customize the Page Layout
-
Go back to Object Manager > Automation Details.
Click Page Layouts and select Automation Details Layout.
Ensure the following fields are visible:
- Automation ID
- Communication Channel
- Job ID (Lookup)
- Contact and Lead (Lookup)
- Start Date, Complete Date
- Status (Picklist)
- Owner, Created By, Last Modified By
- Click Save.
- After this, the page layout looks as follows.

Step 7: Configure List Views
- Navigate to App Launcher > Automation Details.
- Click the Gear Icon > New List View.
- Set the Name (e.g., "Open Automations").
- Add filters like Status = In Progress.
- Click Save.
Step 8: Test the Page
- Create a Test Record to verify the layout and functionality.
- Ensure lookup fields link to Job, Contact, and Lead records.
- Validate the page with different user profiles to check permissions.
Step 9: The final Automation Details page layout after testing a record looks as follows.

Automation Detail object mapping in Jobrock
Step 1: Access the JobRock Account In Salesgorce Org Home Tab Section-
For logging in to JobRock, go to the Account button as shown in the screenshot below.

Step 2: Navigate to the Integration Section
- In the JobRock Application Interface, go to the Admin Panel.
- Click on Integrations.
- as shown in the screenshot below.

Step 3: Open ATS Object Mapping
- Inside the Integrations section, click on ATS Object.
Step 4: Select Automation Details Object
- From the list of ATS Objects, find and select Automation Details.
- as shown in the screenshot below.

Step 5: Map Salesforce Fields to JobRock Fields
as shown in the screenshot below.

Step 6: Save and Confirm Mapping
- Review all field mappings carefully.
- Click Save Mapping to confirm.
Step 7: Test the Mapping
- Create a test record in Salesforce under Automation Details.
- In JobRock, click Sync Now to fetch the latest data.
- Verify that the test record appears correctly in JobRock.
Creation of the Automation Question object and its fields in Salesforce.
Step 1: Navigate to Object Manager
-
Go to Setup in Salesforce.
In the Quick Find box, search for Objects and select Object Manager.
Click Create > Custom Object.
Enter the Label as "Automation Question".
Enter the Plural Label as "Automation Questions".
Set the Object Name as "Automation_Question".
Enable the following options:
- Allow Reports
- Track Field History (if needed)
- Allow Search
- Click Save.
- After Creating Object its Look Like Below

Step 2: Create Fields for Automation Question
- Open the Automation Question object in Object Manager.
- Click Fields & Relationships > New.
- Create the following fields:
Date/Time Fields:
- Action (API Name:
Action__c) - Answer Date (API Name:
Answer_date__c)
Number Field:
- Answer Numeric (API Name:
Answer_Numeric__c, Length: 18, Decimal Places: 0)
Text Fields:
- Answer Text (API Name:
Answer_text__c, Length: 255) - Answer Type (API Name:
Answer_Type__c, Length: 255) - Automation Question Name (API Name:
Name, Length: 80) - Comment (API Name:
Comment__c, Length: 255) - Jr Automation ID (API Name:
JrAutomationId__c, Length: 255) - Jr Environment ID (API Name:
JrEnviromentId__c, Length: 255) - JR ID (API Name:
jrid__c, Length: 255) - Question (API Name:
Question__c, Length: 255) - Question ID (API Name:
QuestionId__c, Length: 255) - Question Title (API Name:
QuestionTitle_c__c, Length: 255)
Lookup Fields:
- Automation Details (API Name:
Automation_Details__c, Lookup to Automation Details object) - Created By (API Name:
CreatedById, Lookup to User) - Last Modified By (API Name:
LastModifiedById, Lookup to User) - Owner (API Name:
OwnerId, Lookup to User, Group)
Record Type:
- Record Type (API Name:
RecordTypeId, Standard Record Type field)
- Click Save after creating each field.
Step 3: Verify Object and Fields
- Go to Object Manager > Automation Question > Fields & Relationships.
- Confirm all fields are created correctly.
Step 4: After creating all the fields, the Automation Question object looks as follows.

Create automation Question page in Salesforce
Step-by-Step Guide to Creating the Automation Question Page in Salesforce
Step 1: Navigate to Object Manager
- Go to Setup in Salesforce.
- In the Quick Find box, search for Objects and select Object Manager.
- Locate and select Automation Question.
Step 2: Create a Lightning Record Page
- Click on Lightning Record Pages in the left panel.
- Click New and select Record Page.
- Enter the Label as "Automation Question Page".
- Choose Automation Question as the object.
- Select Lightning App Builder and click Next.
Step 3: Design the Page Layout
-
Choose a Page Template (e.g., Header and Left Sidebar or Three Regions).
Click Next and add the following components:
- Record Detail Component (Drag and drop the Record Detail component to display fields).
- Related Lists (Add sections for related Automation Details and other linked records).
- Tabs Component (To separate sections like Details, Related, and Notes).
- Custom Components (If needed for advanced features like question tracking or logs).
- Click Save.
Step 4: Assign the Page as Default
-
Click Activate after saving.
Choose where this page should be assigned:
- Org Default (For all users).
- App Default (For a specific app like Sales or Service Console).
- Profile-Based Assignment (For specific user profiles).
- Click Save and Activate.
Step 5: Customize the Page Layout
-
Go back to Object Manager > Automation Question.
Click Page Layouts and select Automation Question Layout.
Ensure the following fields are visible:
- Automation Details (Lookup)
- Question
- Question ID
- Answer Type
- Answer Date
- Answer Numeric
- Answer Text
- JrAutomationId
- JrEnvironmentId
- Owner, Created By, Last Modified By
- Click Save.
Step 6: Configure List Views
- Navigate to App Launcher > Automation Question.
- Click the Gear Icon > New List View.
- Set the Name (e.g., "Unanswered Questions").
- Add filters like Answer Text = Blank.
- Click Save.
Step 7: Test the Page
- Create a Test Record to verify the layout and functionality.
- Ensure lookup fields link to Automation Details records correctly.
- Validate the page with different user profiles to check permissions.
Step 8: The final Automation Question page layout after testing a record looks as follows.

Automation Question object mapping in Jobrock
Step 1: Access the JobRock Account In Salesgorce Org Home Tab Section-
For logging in to JobRock, go to the Account button as shown in the screenshot below.
Step 2: Navigate to the Integration Section
- In the JobRock Application Interface, go to the Admin Panel.
- Click on Integrations.
- as shown in the screenshot below.
Step 3: Open ATS Object Mapping
- Inside the Integrations section, click on ATS Object.
Step 4: Select Automation Details Object
From the list of ATS Objects, find and select Automation Question.
as shown in the screenshot below.

Step 5: Map Salesforce Fields to JobRock Fields
1.As Shown In below :

Step 6: Save and Confirm Mapping
- Review all field mappings carefully.
- Click Save Mapping to confirm.
Step 7: Test the Mapping
- Create a test record in Salesforce under Automation Question.
- In JobRock, click Sync Now to fetch the latest data.
- Verify that the test record appears correctly in JobRock.