9. Jobrock Contact Hub
This article is about the Jobrock Contact Hub, a powerful feature that enables Salesforce admins to configure various functionalities while saving the end-users multiple manual actions each time. Furthermore, this guide provides insights into essential parameters, from Types to Template Ids, enabling a seamless and efficient experience. Learn how to set up multi-brand functionality, preselect appointment options, and utilize template IDs to enhance communication flows. Unlock the potential of the Contact Hub to accelerate recruitment efforts and optimize candidate interactions.
The Jobrock Contact Hub
The Contact Hub is a bundled pop-up that enables users to configure and trigger webflow automations, WhatsApp chatbots, appointment invitations, and plan appointments with candidates.
By setting up the Contact Hub in Salesforce, users can significantly save time and streamline their workflows, leveraging its flexibility to create customized buttons for various actions.
In the last section of this article, we'll explore some common use cases to demonstrate how the Contact Hub can enhance the efficiency of frequently used processes.
Contact Hub Parameters
The Contact Hub contains various parameters, with some being required while others are optional. Below is a table with descriptions for each parameter and its respective configuration requirement.
| Parameter | Is required | Description |
| companycode | Yes |
What does it do? It serves as a unique identifier for a client, allowing Jobrock to identify the client accurately. Comes from custom settings. |
|
Link Label |
Yes |
What does it do? This field will determine the text of the call-to-action button visible to users in Salesforce. |
| Type | No |
What does it do? This field enables the user to directly access one of the hub features, bypassing the main dashboard. If this field is left blank, the user will be directed to the main dashboard of the Contact Hub. Type empty = Contact hub main screen Type 1 = Webflow Type 2 = WhatsApp Type 3 = Appointment |
| Subtype | No |
What does it do? In the appointment flow, users have two options: 1) Send manual appointment and 2) Direct appointment flow where recruiters book appointments on behalf of the lead/contact. In the appointment flow, Salesforce admins have the convenience of streamlining the process and bypassing the step of manual option selection by utilizing the "Subtype" parameter with the following values: Subtype = 1 (to select the manual appointment flow) Subtype = 2 (to choose the direct appointment flow) |
| Template Id | No |
What does it do? Enables the Salesforce admin to set up a predefined template that will be automatically selected when its ID is provided in this field. |
| Jobrock Object Name | Yes |
What does it do? Specifies the type of related object in this field, which can be either:
|
| Brand Field | No |
What does it do? This parameter complements the "IsMultibrand" parameter. Users can define the company code of the sub-client they wish to switch to. Otherwise, they must choose a brand from the list of brands they have access to. Possible parameters: “company code” of the client, the user wants to switch to. |
| Select View | No |
What does it do? The Select View field provides users with three options to choose how the Contact Hub will be opened:
|
| IsMultibrand | No |
What does it do? Relevant for clients with multiple brand support (multiple child clients). When a user from one brand attempts to send an appointment to a lead/contact of another brand they have access to, this parameter facilitates brand switching. Possible parameters: True or False (default). |
|
externaluserid |
Yes (Required, only if redirecting from Salesforce) |
What does it do? Salesforce logged-in user ID |
|
logintype |
Yes (Required, only if redirecting from Salesforce) |
What does it do? Used to identify if the user is coming from Salesforce or not. The value for this parameter is fixed and is set as "SF." Logintype = SF |
|
workflowId |
No |
What does it do? Used to find the status list for workflows. |
| Template Type | Yes |
What does it do? This field enables the user to directly access one of the hub features, bypassing the main dashboard. If this field is left blank, the user will be directed to the main dashboard of the Contact Hub. It is linked to the "Type" field and both fields should contain the same value. |
ContactHubDeepLink component fields explained
The Contact Hub component contains various fields that allow users to optimize their processes and fast-track their recruitment activities. If any field is left empty in the component settings, Jobrock will prompt the user to select the necessary options.
As an example, if the Brand Field - the field to associate the related brand - is left empty, Jobrock will prompt the user to select the brand before proceeding. In essence, by filling in more component fields, the recruitment process becomes quicker and more efficient, as it saves users from performing manual actions each time when communicating with candidates.
In this section, we'll explore each parameter in detail to fully grasp its functionality, enabling users to use it in the most efficient manner.
Understanding "Type" in the Contact Hub
This field enables the user to directly access one of the hub features, bypassing the main dashboard. If this field is left blank, the user will be directed to the main dashboard of the Contact Hub.
Type field left empty = Contact hub main screen
Type 1 = Webflow
Type 2 = WhatsApp
Type 3 = Appointment

For example, when a Salesforce admin configures a button to trigger a WhatsApp chatbot, the "Type" field must always be set to value 2. In this scenario, when users click on the button the WhatsApp chatbot window will be opened directly which saves all the users one extra manual action.
Understanding "Subtype" in the Contact Hub
This field enables the user to directly land in the Contact Hub with the preferred subtype preselected, bypassing the main dashboard and also the next manual action to select the preferred appointment type. Leaving this field blank will direct the user to the main dashboard of the Contact Hub, requiring two manual clicks to access the same screen.
NOTE: To ensure proper functionality of the Subtype field, the Salesforce admin must populate the Type field as well.
In the appointment flow, users have two options:
- Send manual appointment and
- Direct appointment flow where recruiters book appointments on behalf of the lead/contact.
Subtype = 1 (to select the manual appointment flow)
Subtype = 2 (to choose the direct appointment flow)

For example, when a Salesforce admin configures a button to directly plan an appointment for the candidate with one click on a button, the following configuration must be done in the Contact Hub component:
Type = 3
Subtype = 2
Understanding "Template Id" in the Contact Hub
By entering a flow template ID in this field, the Salesforce admin can establish a predefined template that will be automatically selected when the ID is provided. Clicking the button will trigger the designated flow template. It's important to note that this flow template will be applied to all users, so it should be relevant for everyone.
For example, it could be a template initiating an "I tried to call you but couldn't reach you" WhatsApp chatbot, followed by a button enabling candidates to schedule a new appointment in the recruiter's agenda.
Understanding "Enter Jobrock Object Name" in the Contact Hub
This field specifies the type of related object in the component settings, which can be either "Contact" or "Lead" (which is the Contact in workflow object in Salesforce).
Since the Contact Hub component is configured either on a contact page or a contact in workflow page in Salesforce, this field becomes mandatory and must be filled.
Understanding "Select View" in the Contact Hub
The Select View field enables the Salesforce admin the ability to choose how the Contact Hub is opened when a user clicks on the button. There are three options to choose how the Contact Hub will be opened:
- Pop-up
- New tab
- New window

The URL structure of the Contact Hub popup explained
The Contact Hub generates a deep link that is flexible in every org. The deep link has a number of parameters that allow Salesforce admins to streamline the recruiter's processes and fast-track their recruitment efforts.
The URL structure of the Contact Hub is dynamic and adapts based on the information filled or left blank in the Contact Hub component, as explained in the previous section.
Let's take a look at three examples:
Example 1: Contact Hub main dashboard's URL structure.
https://hub.jobrock.com/contact-hub?object=lead&Id=a055i00000V5Qf1AAF&externaluserid=0055i00000BsN6cAAF&logintype=SF&ismultibrand=1&recordType=Job_Applicant&companycode=WfPlus&selectedBrand=AADFJTMEGA
As shown, the Brand Field is populated, but Type and Subtype are left blank, requiring the user to decide which communication feature to use.
Example 2: Initiate WhatsApp chatbot URL structure.
https://hub.jobrock.com/contact-hub?object=lead&Id=a055i00000V5Qf1AAF&externaluserid=0055i00000BsN6cAAF&logintype=SF&ismultibrand=1&recordType=Job_Applicant&companycode=WfPlus&selectedBrand=AADFJTMEGA&type=2
In this example, in comparison to the first example, the "Type" field is populated with the value "=2". This configuration ensures that when a user clicks the button, they will immediately land on the WhatsApp chatbot window in the Contact Hub.
Example 3: Direct appointment flow URL structure.
https://hub.jobrock.com/contact-hub?object=lead&Id=a055i00000V5Qf1AAF&externaluserid=0055i00000BsN6cAAF&logintype=SF&ismultibrand=1&recordType=Job_Applicant&companycode=WfPlus&selectedBrand=AADFJTMEGA&type=3&subtype=2
In this example, the "Type" field is populated with the value "=3" and also the "Subtype" field is populated with the value "=2". This configuration ensures that when a user clicks on this button, they will be directly taken to the appointment window in the Contact Hub, with the "Directly plan appointment" option already selected.
Configure the Contact Hub widget on a Salesforce contact (in workflow) page
Ensure that the Contact Hub widget is configured on both the Contact and Contact in workflow pages in Salesforce.
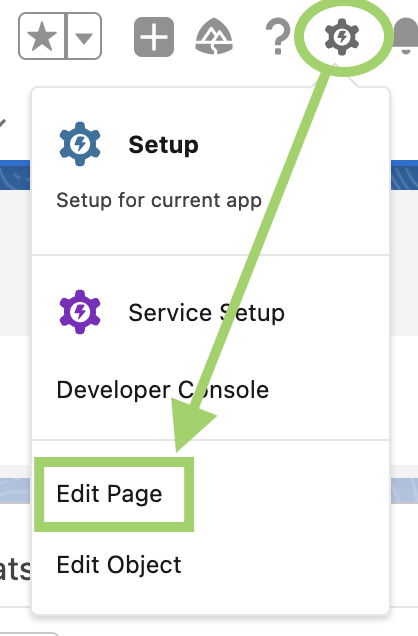
Step 1: Navigate to a Contact page -> Setup -> Edit page

Step 2: Drag the "Accordion" component onto the page
Drag the component somewhere on the Contact page and remove the "Details" section, so there's only one section left in the Accordion.

Step 3: Add a new tab
Click on "Add Tab", then click on the newly added tab, and select "Custom" from the Tab Label dropdown.

Step 4:
Then, enter "Contact Hub" as the new Custom Label name. Hit "Done".

Step 5: Configure the Contact Hub component
Enter "Contact" in the components search bar and drag the "ContactHubDeepLink" component in the 'Contact Hub' section in the Accordion you have just created in the previous step.

Step 6: Save changes
To display the configured Contact Hub widget on the page, hit "Save" in the top right corner.
READ MORE: Examples of how to configure the ContactHubDeepLink component will be demonstrated in detail in the last section of this article, or click here.
How to configure multi-brand in the JR Contact Hub

Step 4: Save the changes
Save the configuration by clicking "Save" at the top right corner.
TIP: Repeat these steps for every Contact Hub action button where multi-brand is relevant.