8. Publication
This article serves as a comprehensive resource for understanding the publication process in Jobrock. It covers the essential steps and considerations for publishing vacancies to various channels, including job boards and websites. From configuring publication settings to managing job postings, this guide provides valuable insights to ensure successful and effective job postings through Jobrock.
Sync records apex class
The Sync Record Apex class is available to synchronize publications between Salesforce and Jobrock. By executing the Sync Record Apex class, changes made to publications in one system can be updated in the other. The "JR Object Type" parameter for publications should be set to "Publication."
NOTE: When multi-brand is enabled, make sure to pass the Client Code too.
Available:
In the managed package: 1.59
| Action Name | Sync Records | Required |
|---|---|---|
| Apex Class | Sync Records | Required |
| JR Object Type | Publication | Required |
| Record Id | Record Id | Required |
| ClientCode | For multi-brands | Required in case of multi-brands |
| Action | Upsert, Delete | Required |
NOTE: The "Upsert" parameter is used to either "update" or "insert" a publication. This action is determined by the existence of the publication in the system. If the publication is already present, JR will perform an update; if not, JR will insert a new publication.
Understanding the publication 'statuses':
Online:
- Job with an online date older than now and the offline date is empty or later than now
Offline:
- Publication with past offline date
- Publication that has been online and comes in without dates
Concept:
- Publication without date and new
Planned:
- Publication with future online date
Delete:
- Publication is removed from the database
TIP: Date fields are mandatory to map for publication status. Jobrock can only process a single online date and an offline date.
Defining the publication structure
Via ‘Entity’ configuration you can create/define the required fields for a publication and order them according to your preference. As a general rule, we recommend leaving the publication object as clean as possible and letting most of the fields only exist on the job level. This will keep the publication flow as short as possible.
If you need to you can decide to copy a field from a job object and automatically copy its possible values. You can do this by giving the field the same name as you see it appear on the job object. This will allow you to choose a different value from what you have found for that field on the job object.
An example use case: a job is open for a full-time and part-time candidate and you are keen to assign different facets to the job and write different publications.
How to create fields for publications?
Step 1: Go to Admin -> Entity ->Entity Fields
Step 2: Choose the publication tab
Step 3: Click on “Add Field”

Configuring the publication mapping
Next, to get started with the publication mapping to inform Salesforce, follow the steps below:
Step 1: Log in to Salesforce as an admin user and access Jobrock
Start by logging in to your Salesforce account. Once you are in Salesforce, navigate to the Jobrock widget by clicking on the appropriate tab provided within Salesforce.
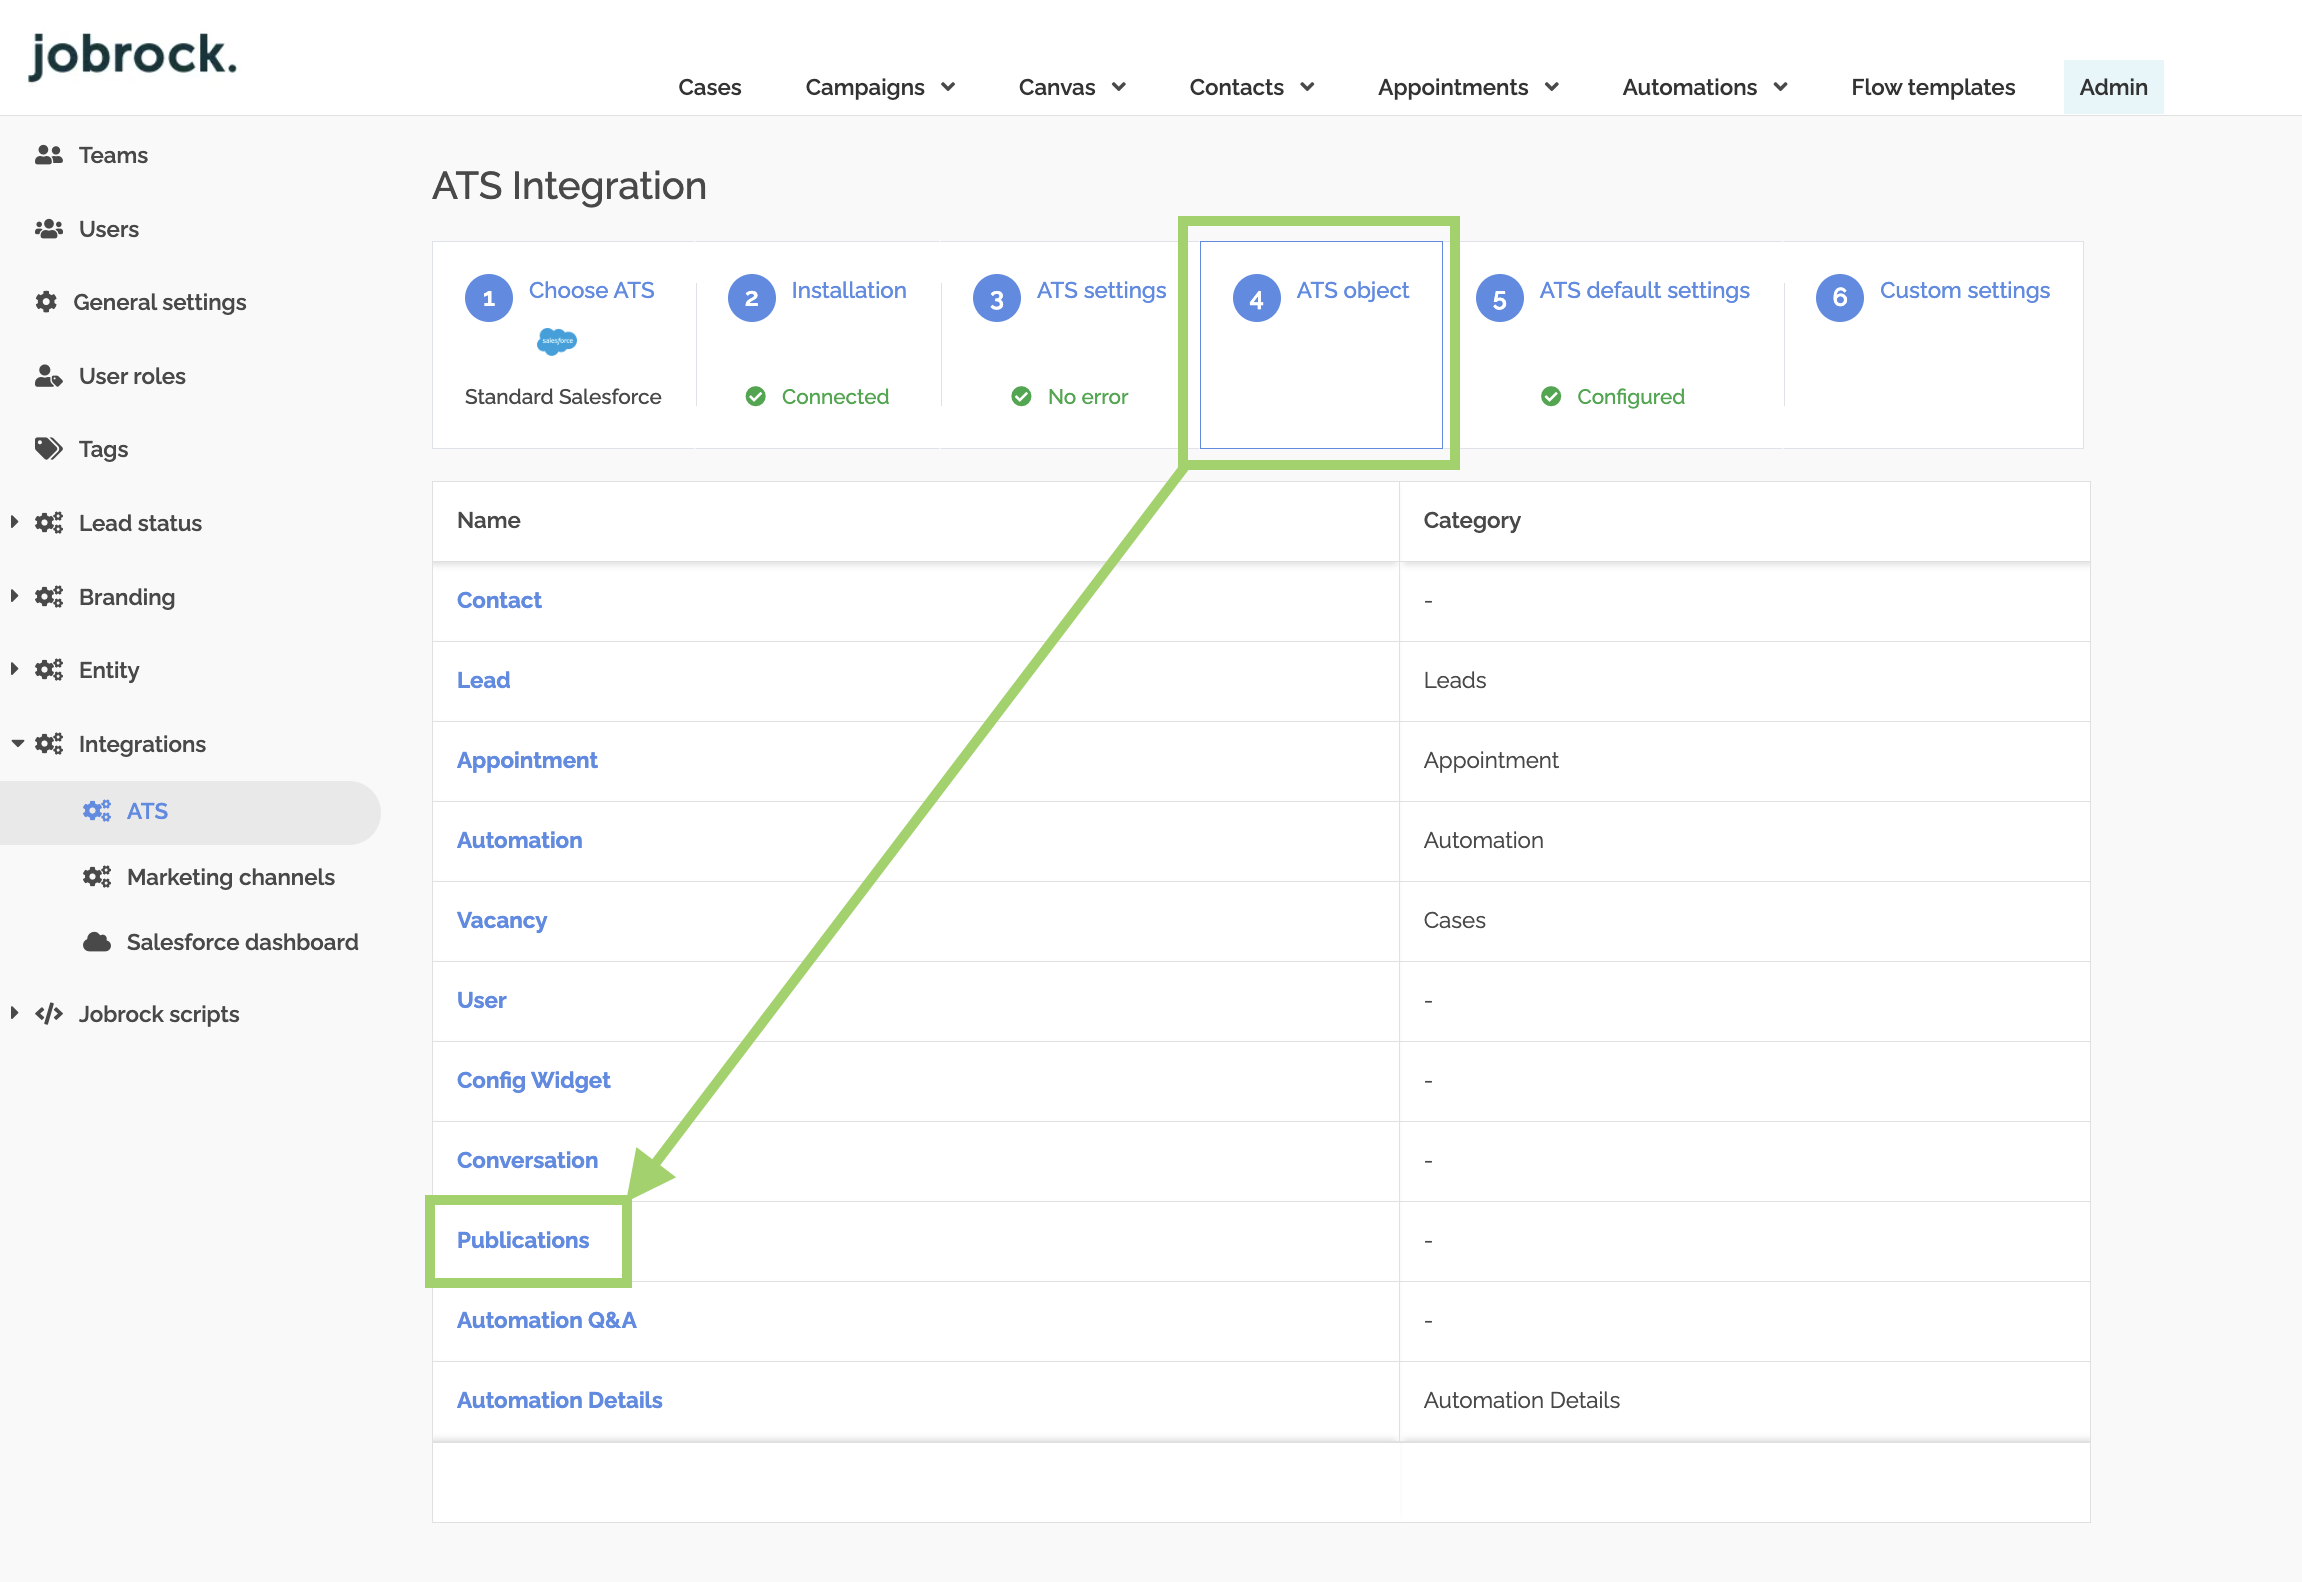
Step 2: Go to the Publications
Go to the Admin page and navigate to Integrations -> ATS -> ATS Object -> Publications
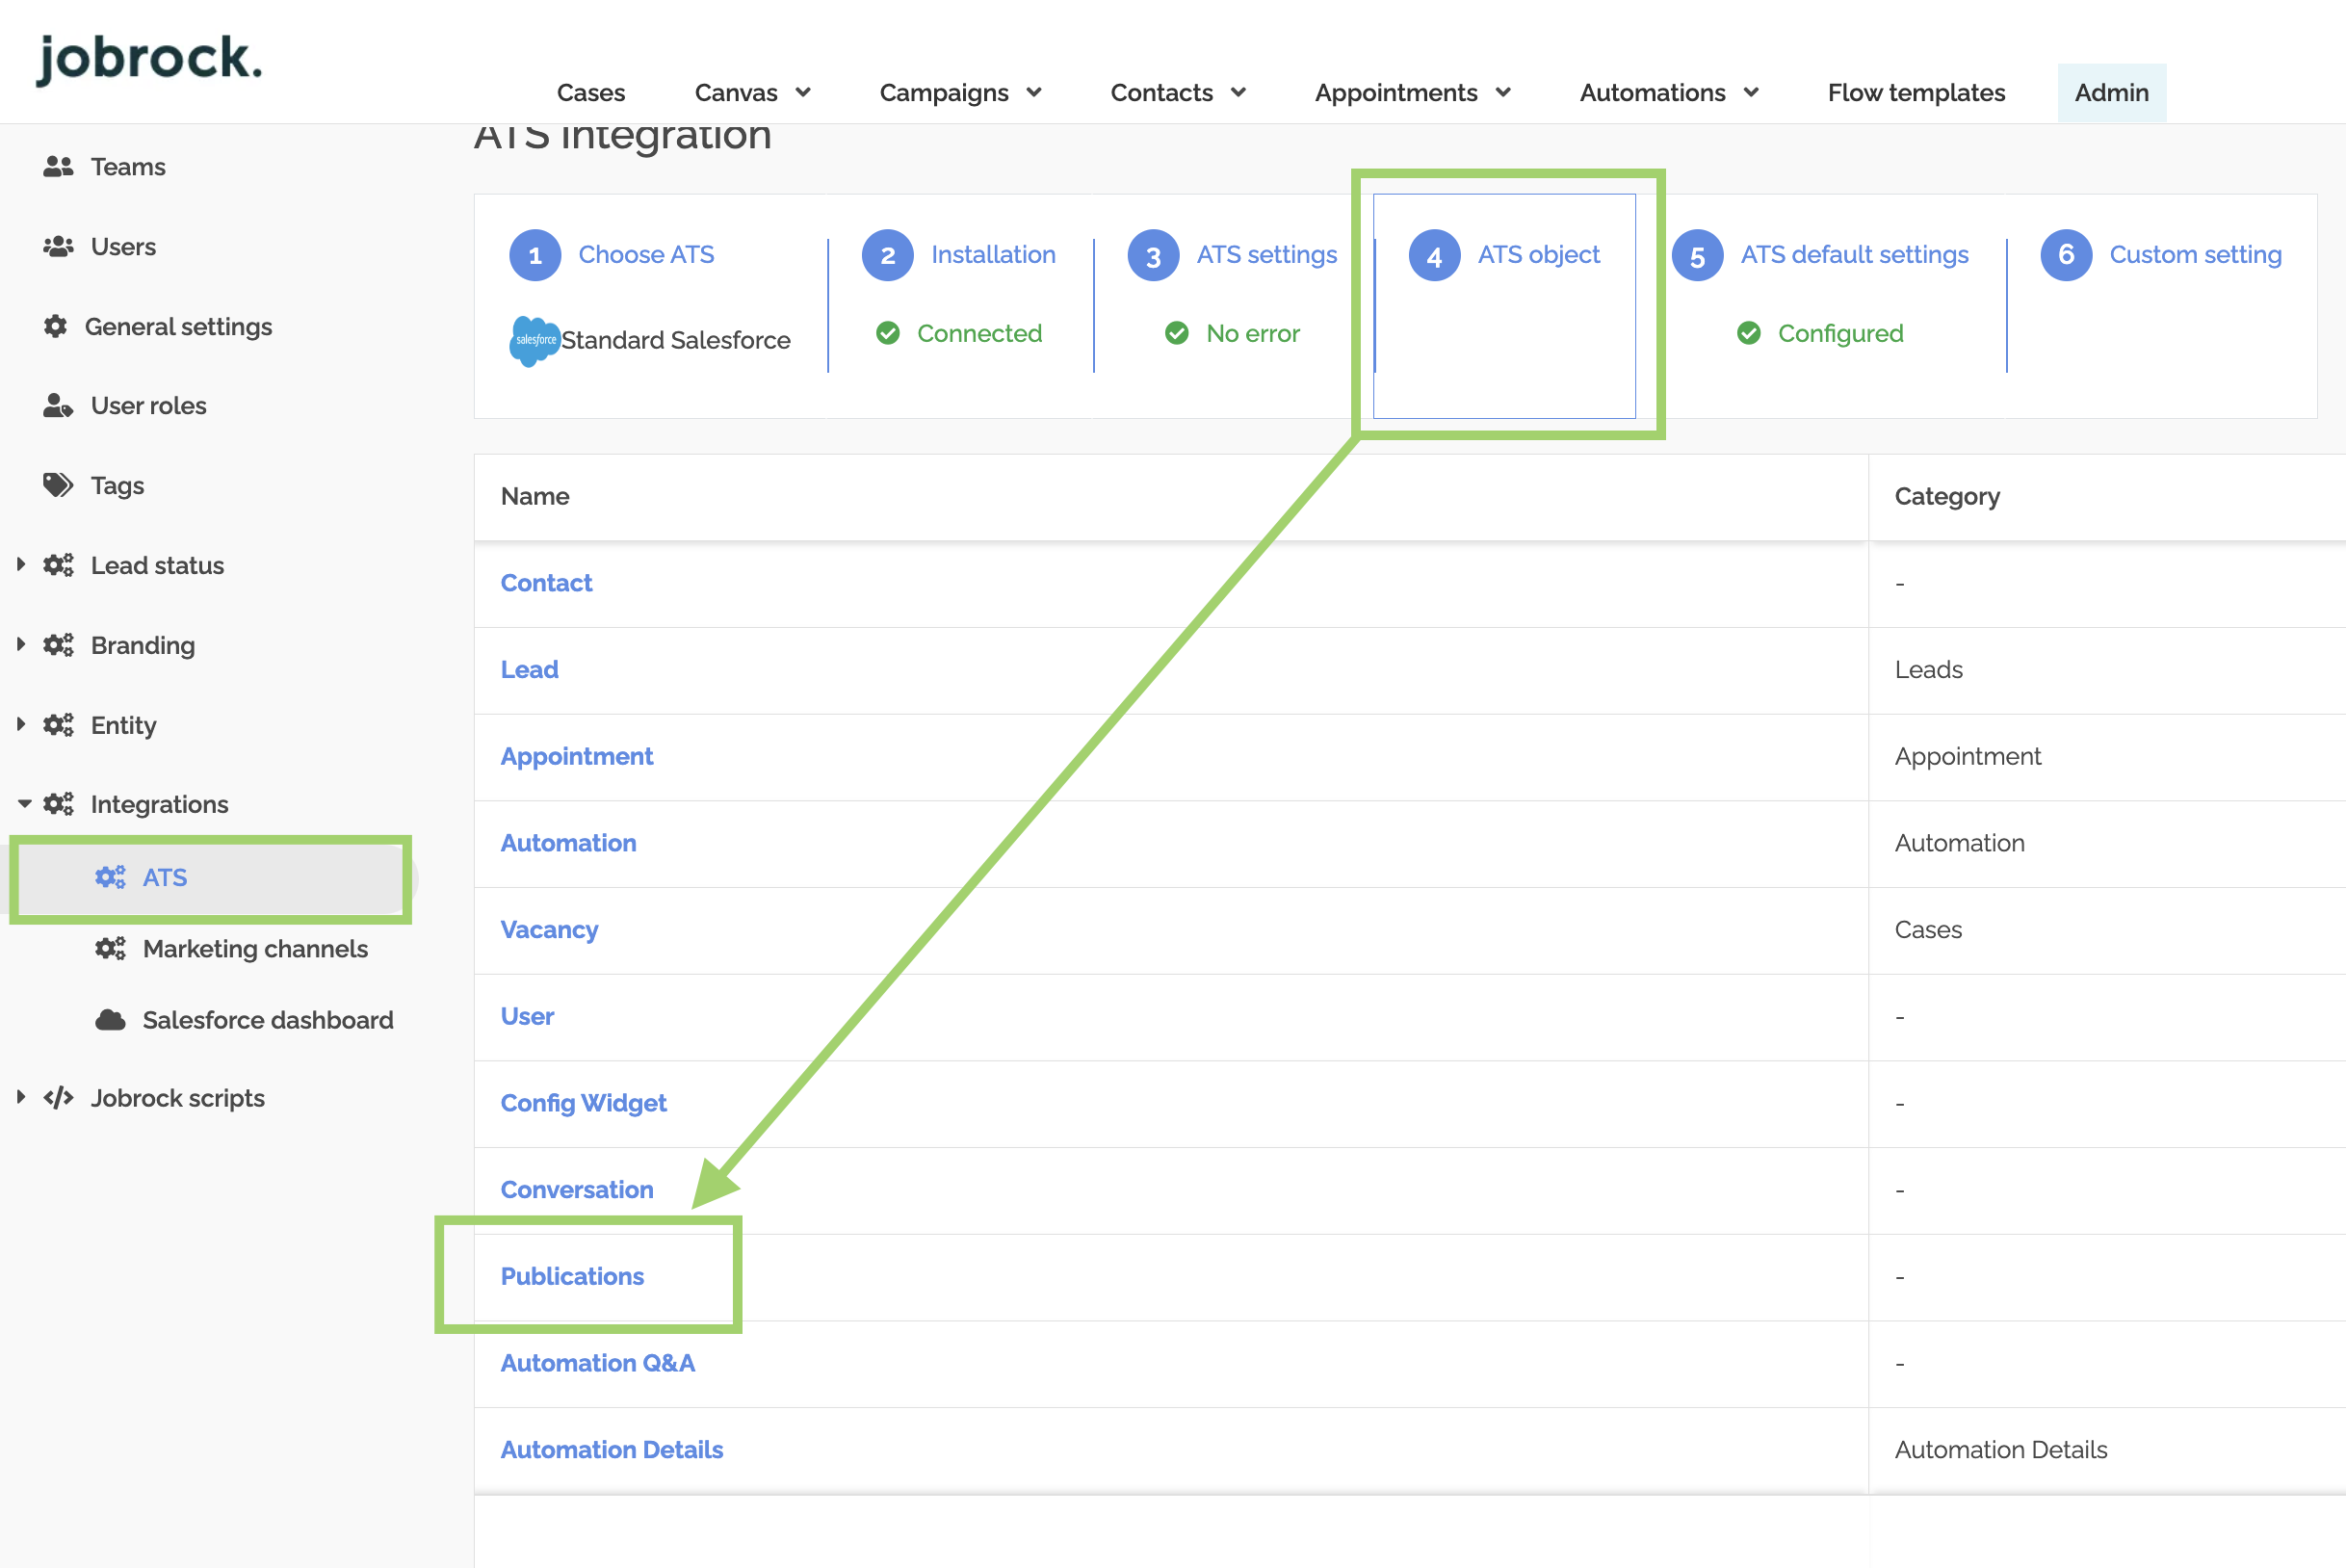
Step 3: Select Publications in the ATS Object screen
Select the “Publications” object name from the ATS Object drop-down to map against the correct Jobrock object. In this example, the object name for Publications is the same in JR and SF.
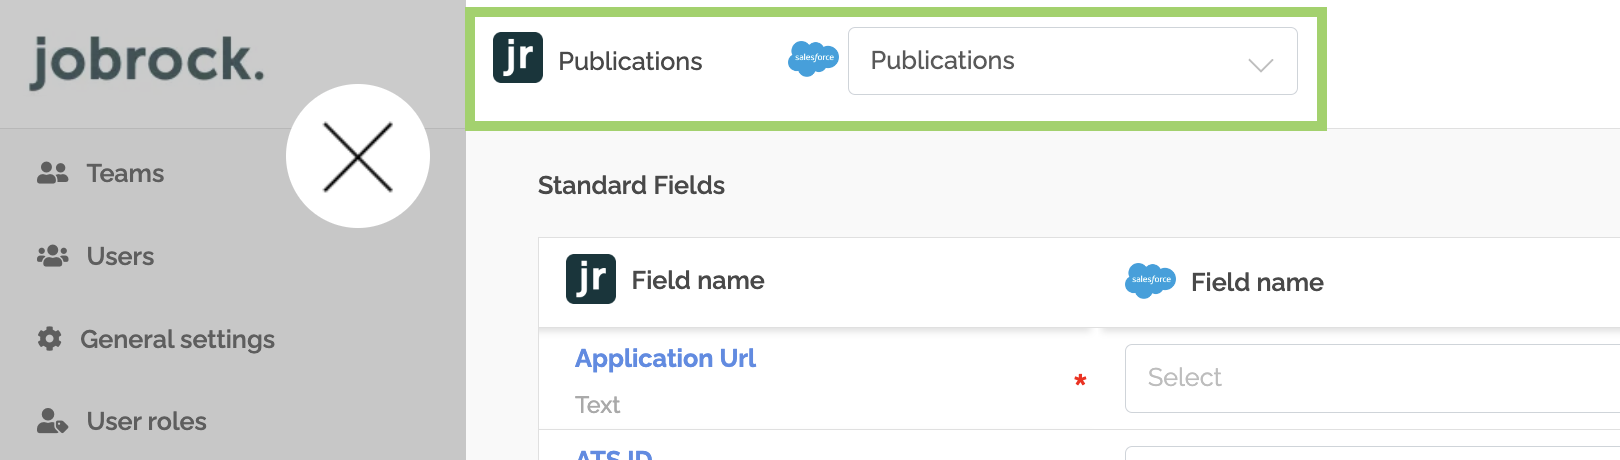
Step 4: ATS field name selection
Choose the required Jobrock field name and the correct corresponding Salesforce field name.

Ensure that you also configure the four fields related to publication statuses. Jobrock will dynamically display the corresponding status of a publication based on the status fields defined in Salesforce.
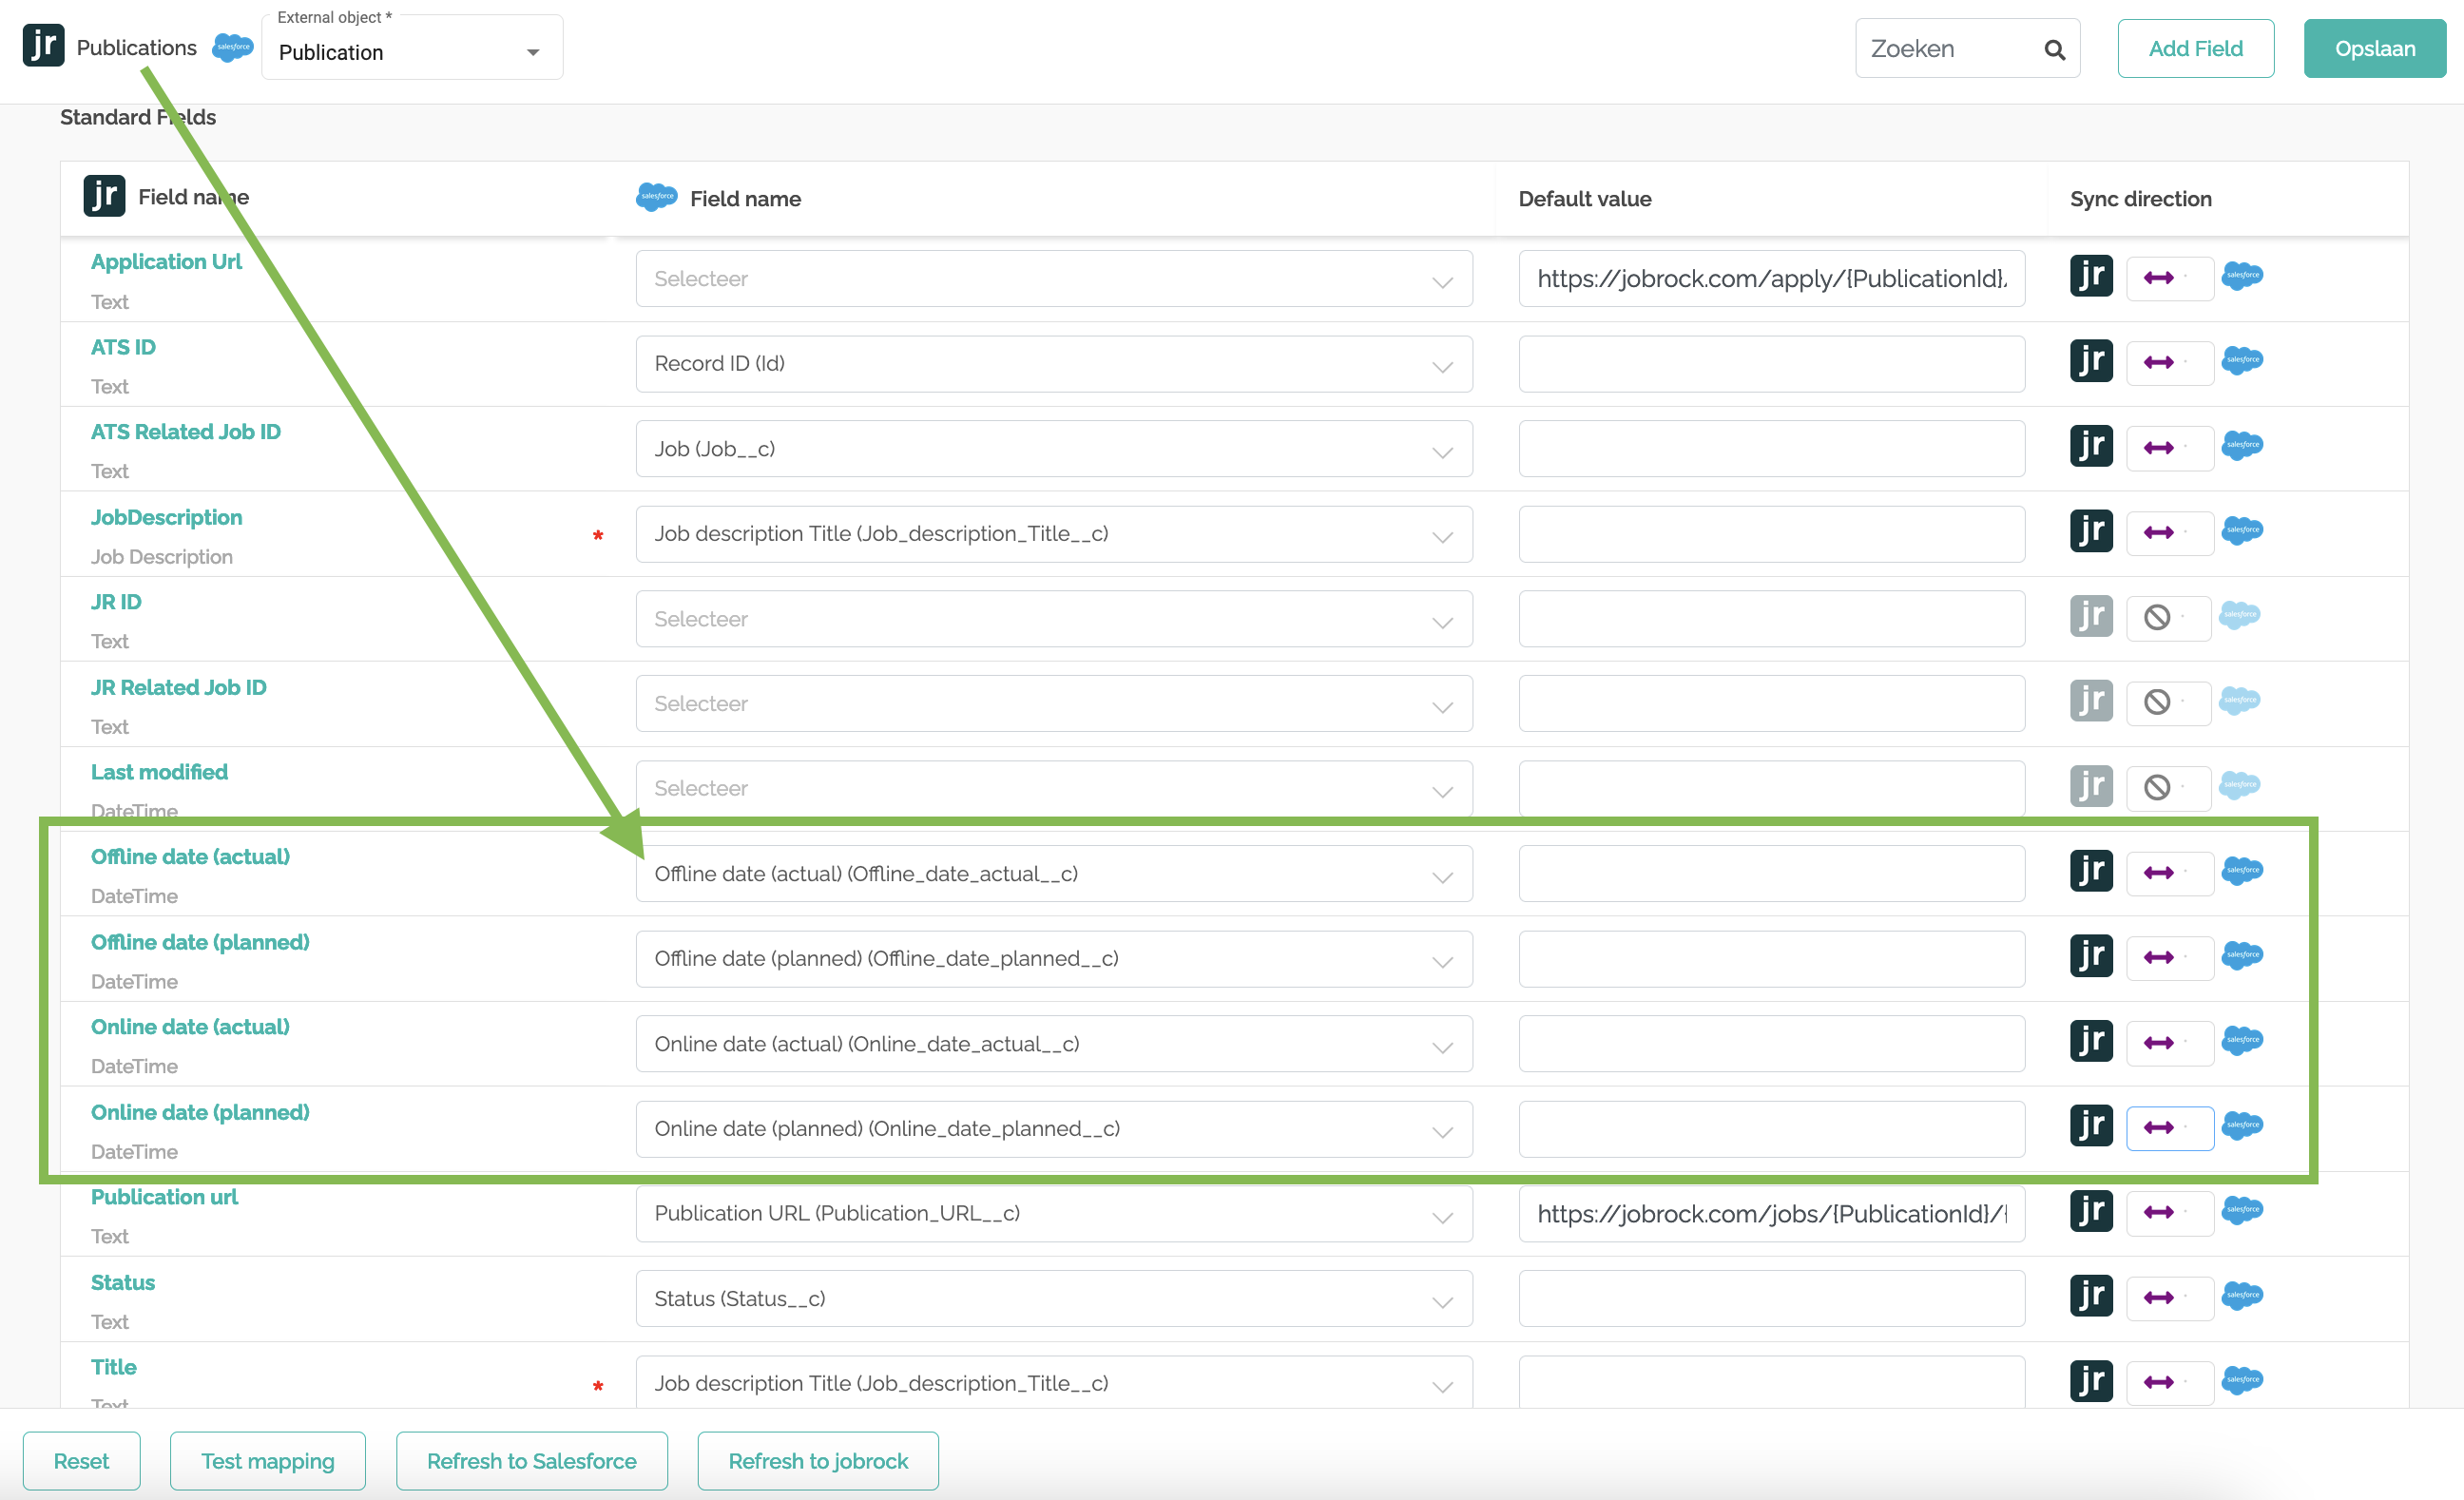
Step 5: Validate required fields & sync direction
Validate that all the required fields are mapped and no errors are displayed for any of the fields. The required fields on the publication object are indicated with a red * symbol, for example:

Then, make sure the sync direction is configured correctly.
TIP: Jobrock recommends always enabling the Push & Pull sync direction so publications in Jobrock and Salesforce are in sync at all times.
Step 6: Save the validated configuration
Once you've validated all the object mapping settings, hit "Save" at the top right corner of your screen.

How to add the OnlineUrl and ApplicationUrl
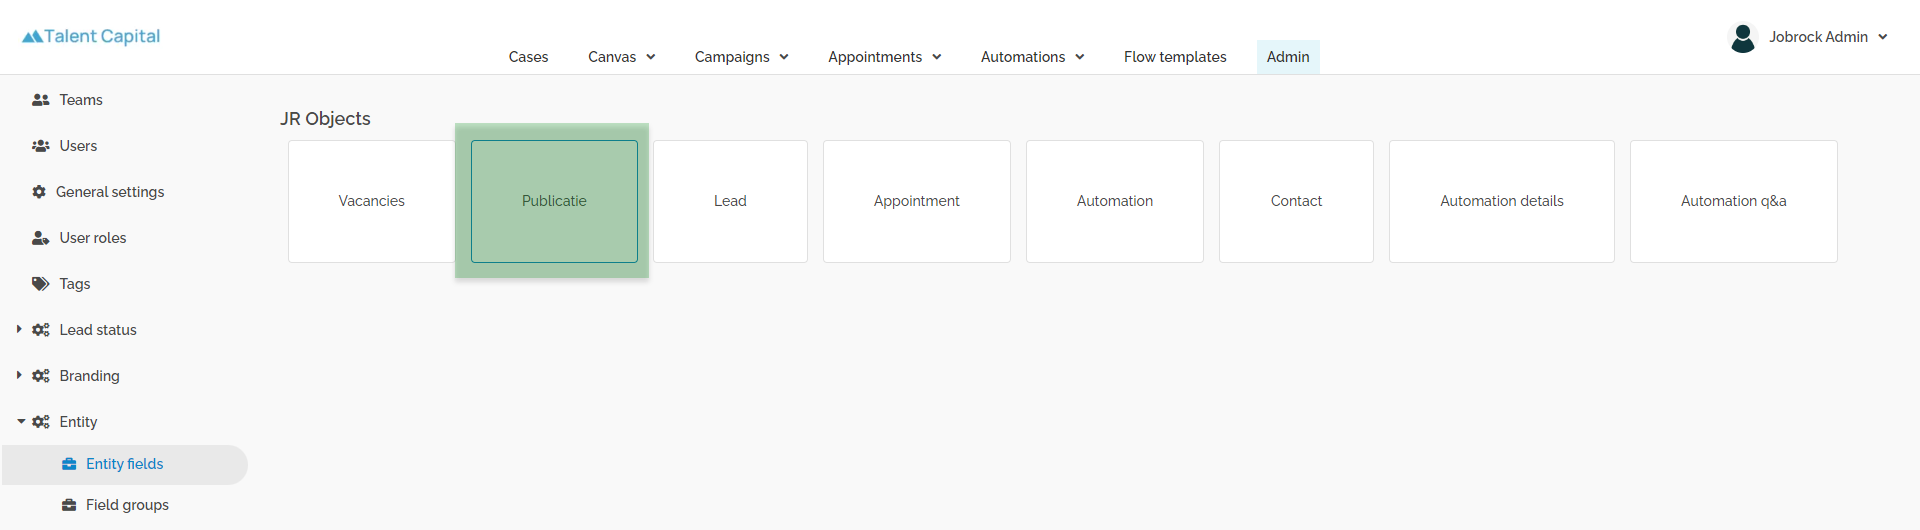
Step 1: Entity fields
Go to the Entity fields configuration screen in the Jobrock admin module via Admin > Entity > Entity fields.

Step 2: Open the publication object
Click on the Publication block to open the publication object.
Step 3: Edit the OnlineUrl field
Click the 3 dots behind the OnlinUrl field and click on Edit.

How to configure the OnlineUrl
At the bottom of the pop-up, you will find the default value for this OnlineUrl field.
Here you can update/customize the URL structure.
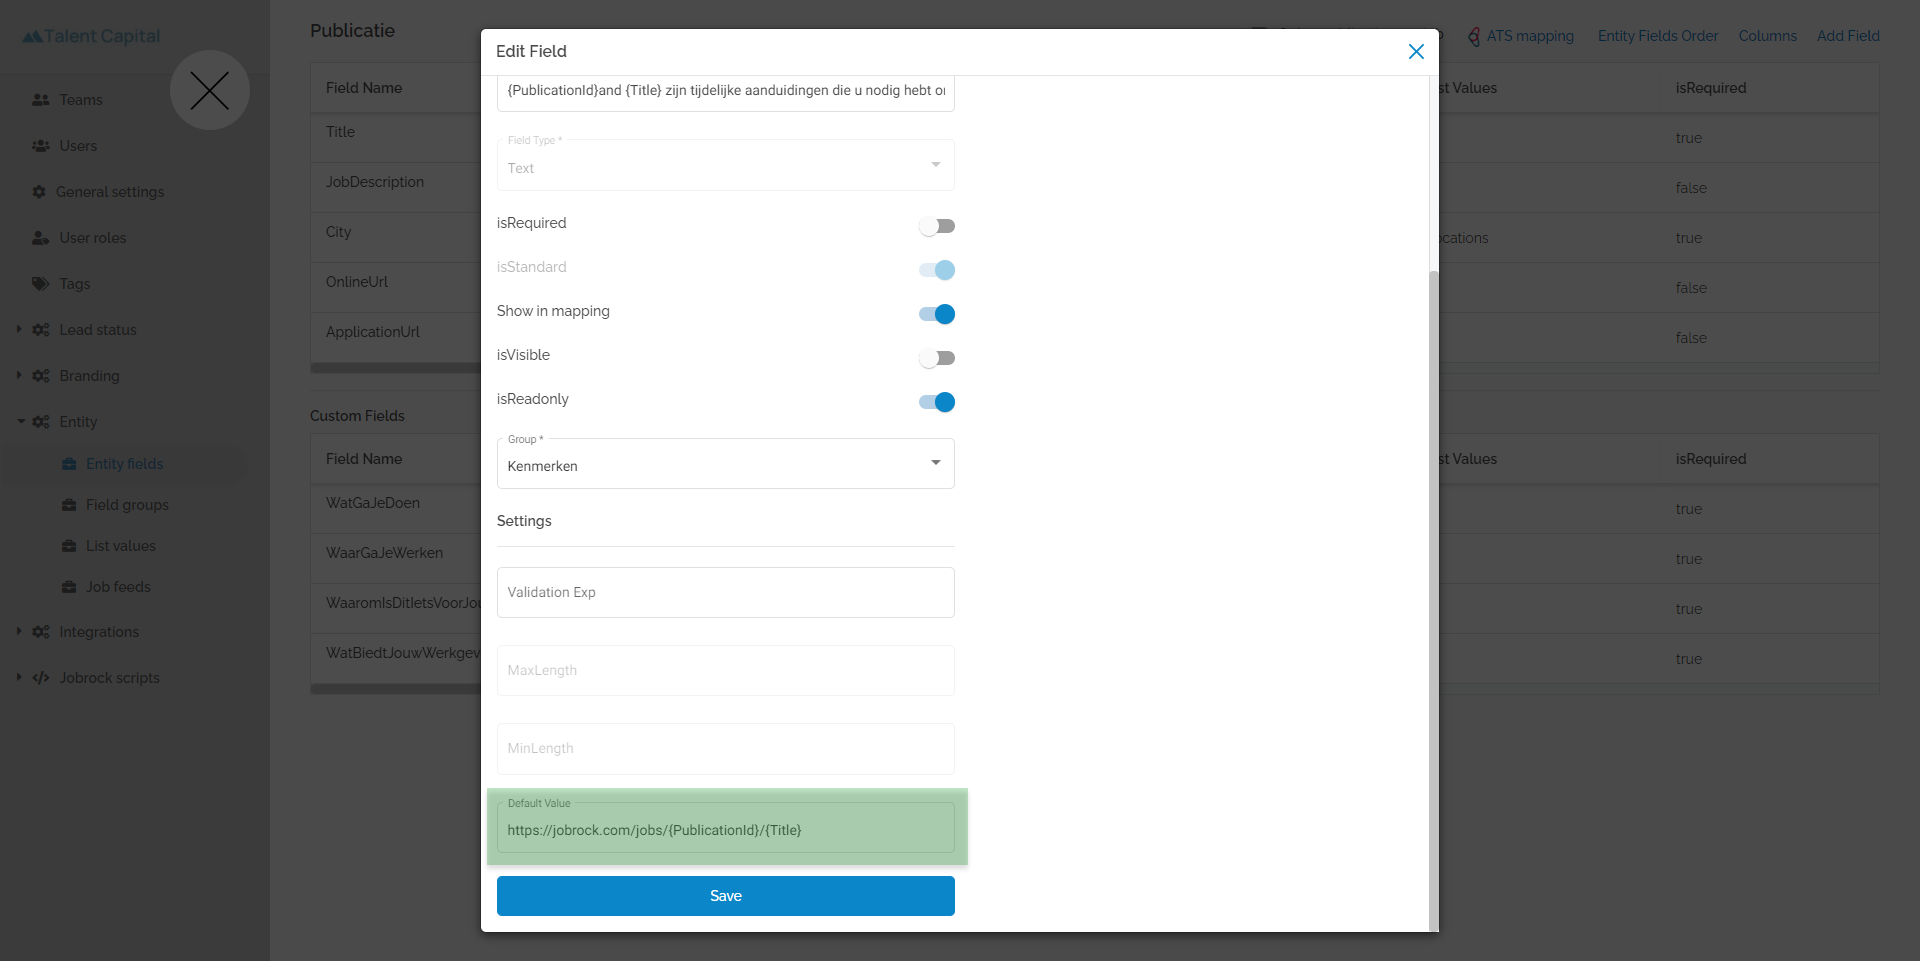
TIP: Jobrock recommends using the following format: https://yourdomain.com/jobs/{PublicationID}/{Title}
Adding a publication ID will make sure you always generate a unique publication URL.
How to configure the ApplicationUrl
The ApplicationUrl can be configured/ changed similarly to the steps described above.
NOTE: This URL can be different from the OnlineUrl in case a candidate is sent to a different page to apply.
If this is not the case for you, make sure the ApplicationUrl is the same as the OnlineUrl.
Final validation & verification
To ensure that the publication object is synchronized and configured correctly between Salesforce and Jobrock, the following steps can be taken.
Step 1: Create a new test publication
Go to the Hub where you can create a new publication for testing purposes. Fill out the required fields of the publication and publish it to -> Online.
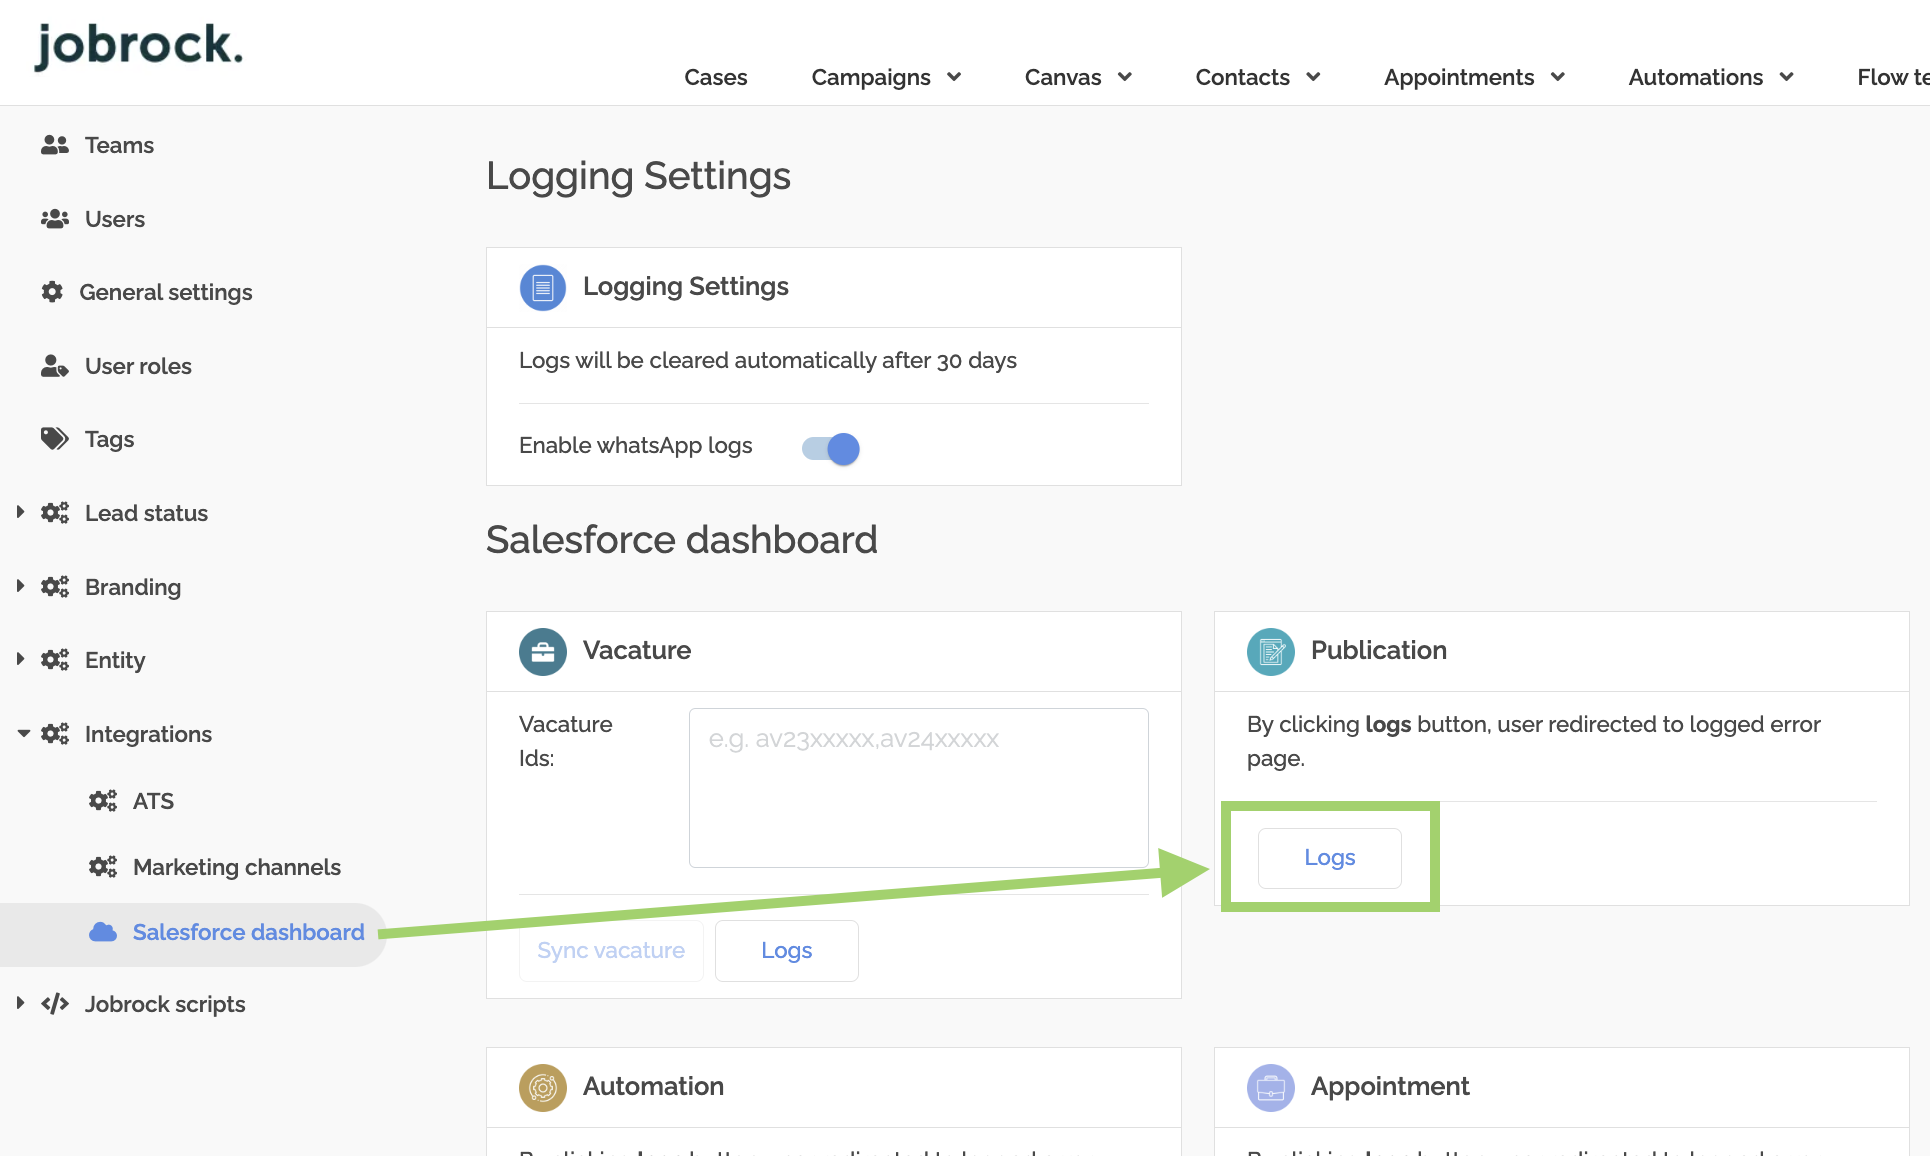
Step 2: Go to the Salesforce dashboard
Go to the Salesforce dashboard in Jobrock and click on "Logs" on the publication object.
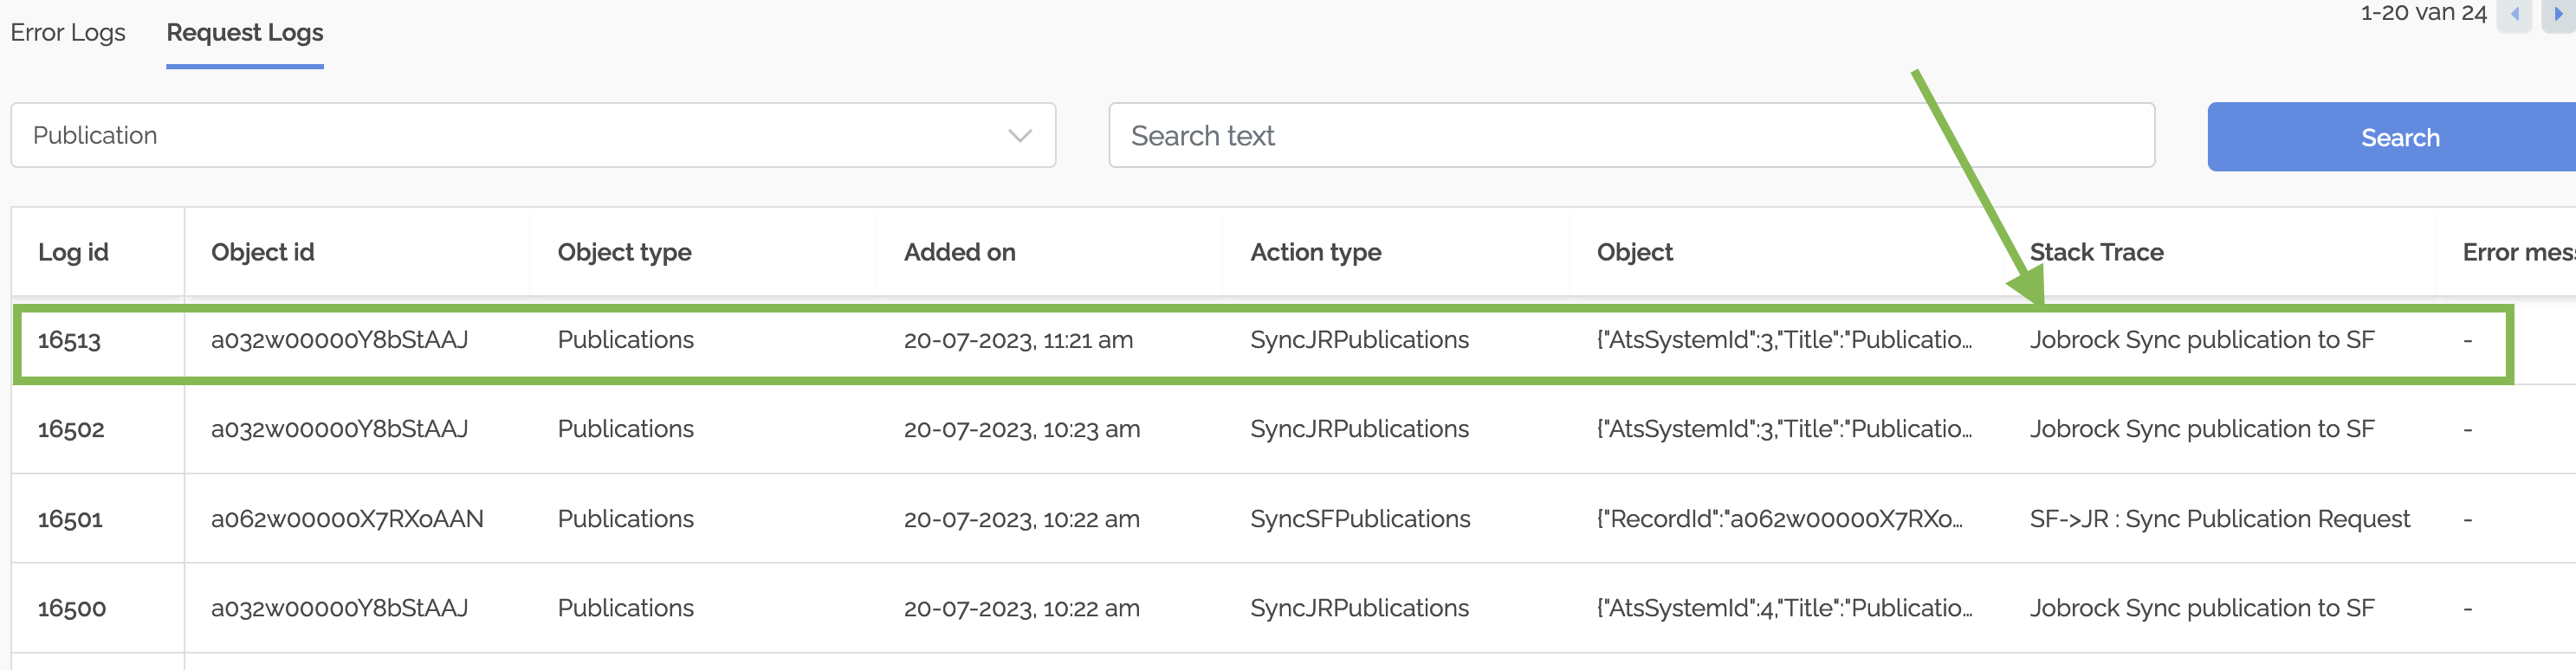
Step 3: Go to the request log
Verify if the publication you have just created shows in the request log at the top, this may take 1 or 2 minutes to appear. Review the logs to ensure that the Sync Publication call is recorded for each request, indicating that the synchronization process is occurring properly.
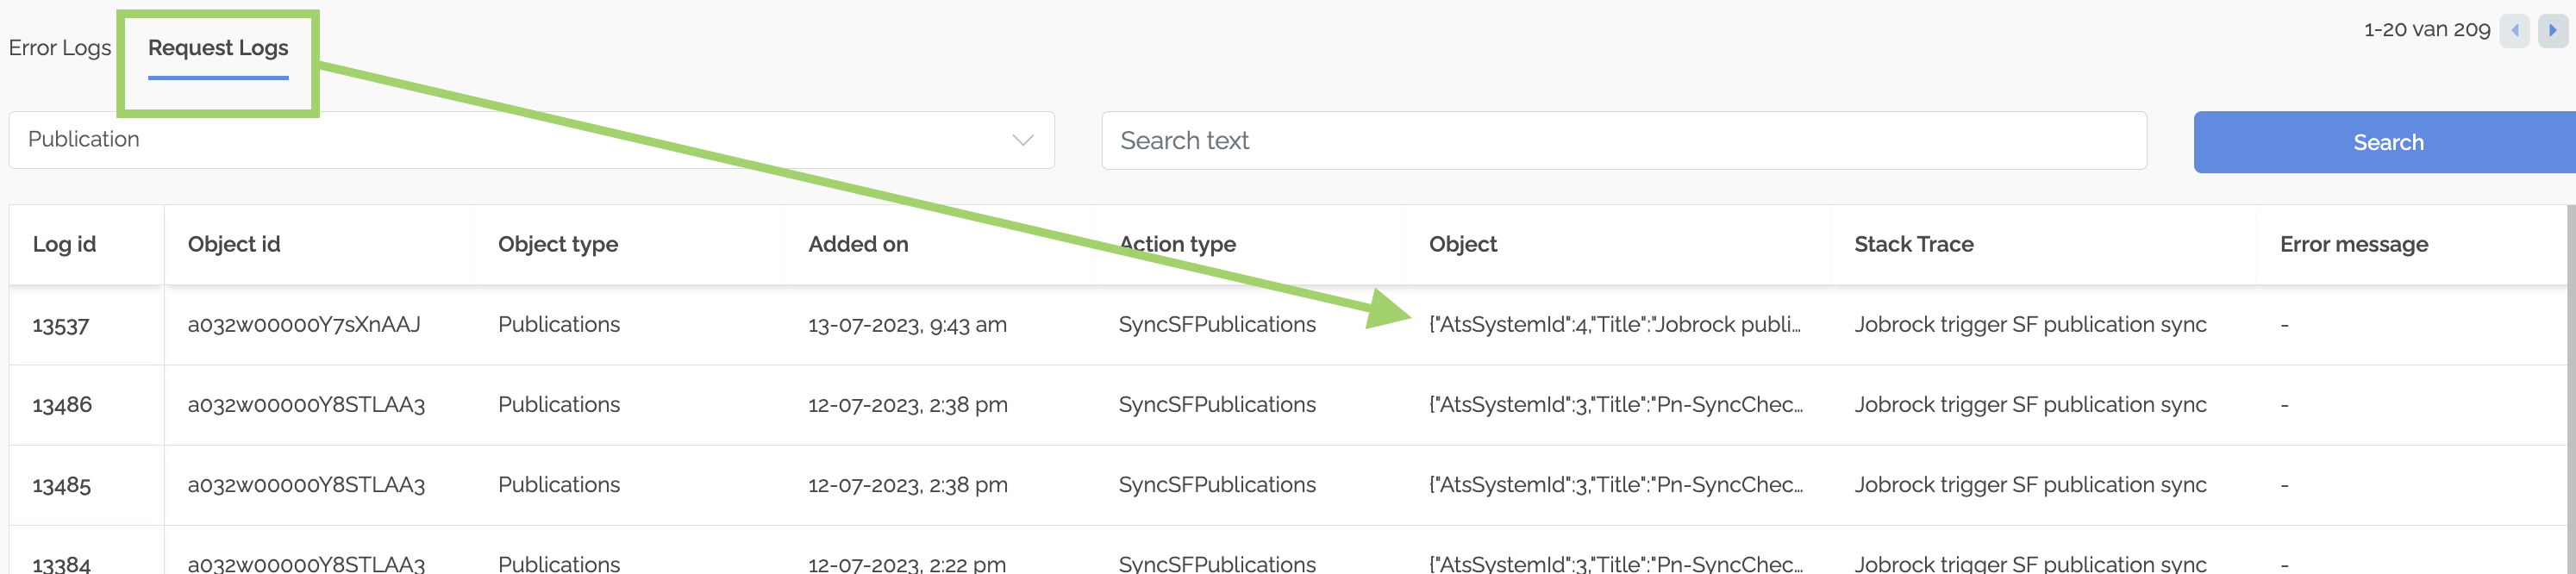
Step 4: Identify the publication and vacancy ID
Click on the text below the "Object" column title to open the request log, refer to the screenshot above. Then, find the "ATSRefId" and "ATSRefId1" values in the pop-up. You will need these IDs in the following steps.
{
  "AtsSystemId": 3,
  "Title": "PublicationSync-JOB",
  "OnlineUrl": "https://jobrock.com/jobs/{PublicationId}/{Title}",
  "ApplicationUrl": "https://jobrock.com/apply/{PublicationId}/{Title}",
  "CanPublish": true,
  "JobDescription": "Jobrock publication",
  "ATSRefId": "a062w00000X7RXoAAN",
  "ParentAtsId": "a032w00000Y8bStAAJ",
  "StartDate": "2023-07-20T08:21:25",
  "EndDate": null,
  "OnlineDate": "2023-07-20T08:22:03",
  "UpdatedOnline": "2023-07-20T08:23:01.027",
  "OfflineDate": null,
  "Status": "Online",
  "ParentEntityId": 7367,
  "RecordTypeId": null,
  "OnlineType": 0,
  "PublicationId": "17406",
  "OfflineType": 0,
  "ImportPublicationId": null,
  "AtsRefId1": "a032w00000Y8bStAAJ",
  "LanguageId": 1,
  "IsDeleted": true,
  "DeletedAt": null,
  "CreatedBy": 224520,
  "UpdatedBy": null,
  "CreatedAt": "2023-07-20T08:21:25.47",
  "UpdatedAt": "2023-07-20T08:22:42.993",
  "Id": 7406,
  "Location": "''s-Graveland",
  "Country": null,
  "DefaultField": "DefaultValuePub",
  "Test": "TestDefault",
  "Type": "Publication"
}
NOTE: Be sure to copy both IDs to your clipboard as you will need them in the following steps to confirm the successful configuration of the publication object.
ATSRefId = The related Salesforce publication ID
ATSRefId1= The related Salesforce vacancy ID
Step 5: Go to the ATS integration dashboard
Go to the ATS integration dashboard in Jobrock via Admin -> Integrations -> ATS. Then, click on the ATS object and open the "Publications" object.
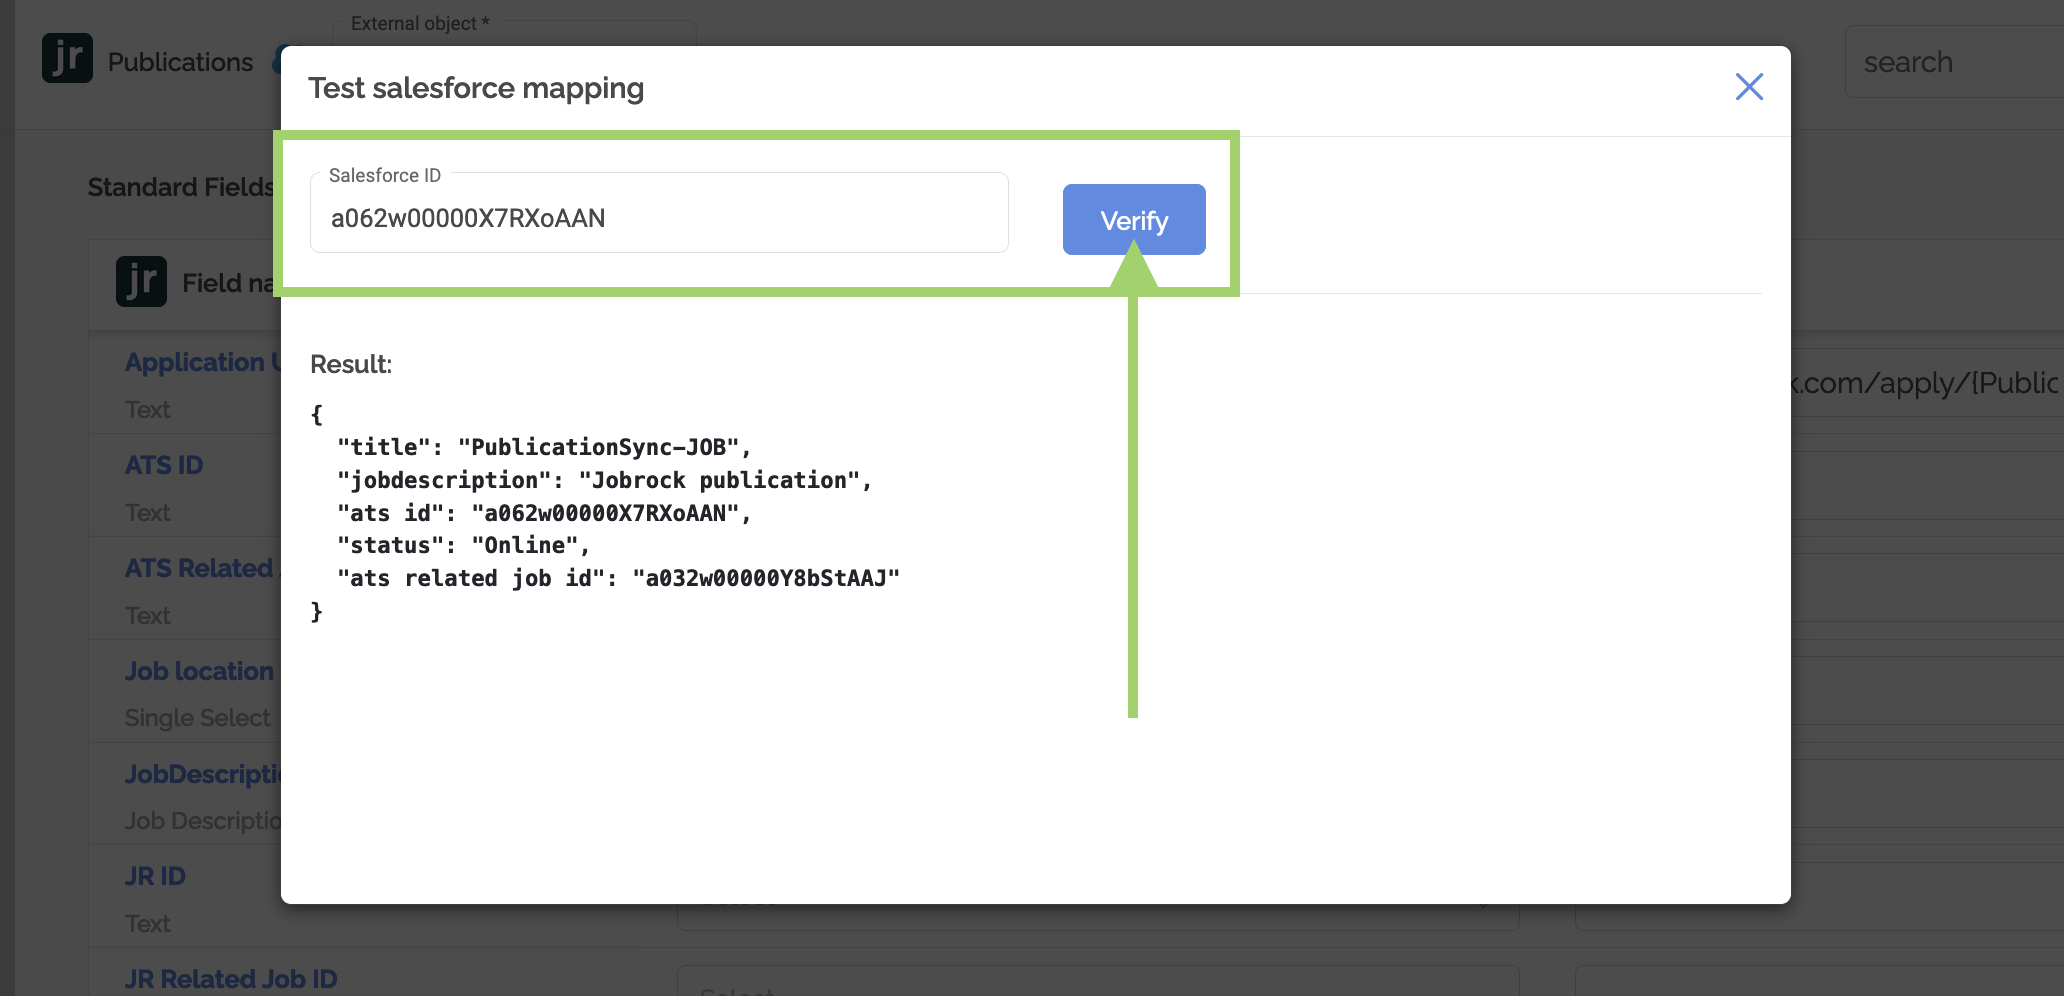
Step 6: Test mapping
Click on the test mapping button in the publication mapping window by entering the publication ID (ATSRefId) from step 4 of a specific publication to verify its mapping configuration.
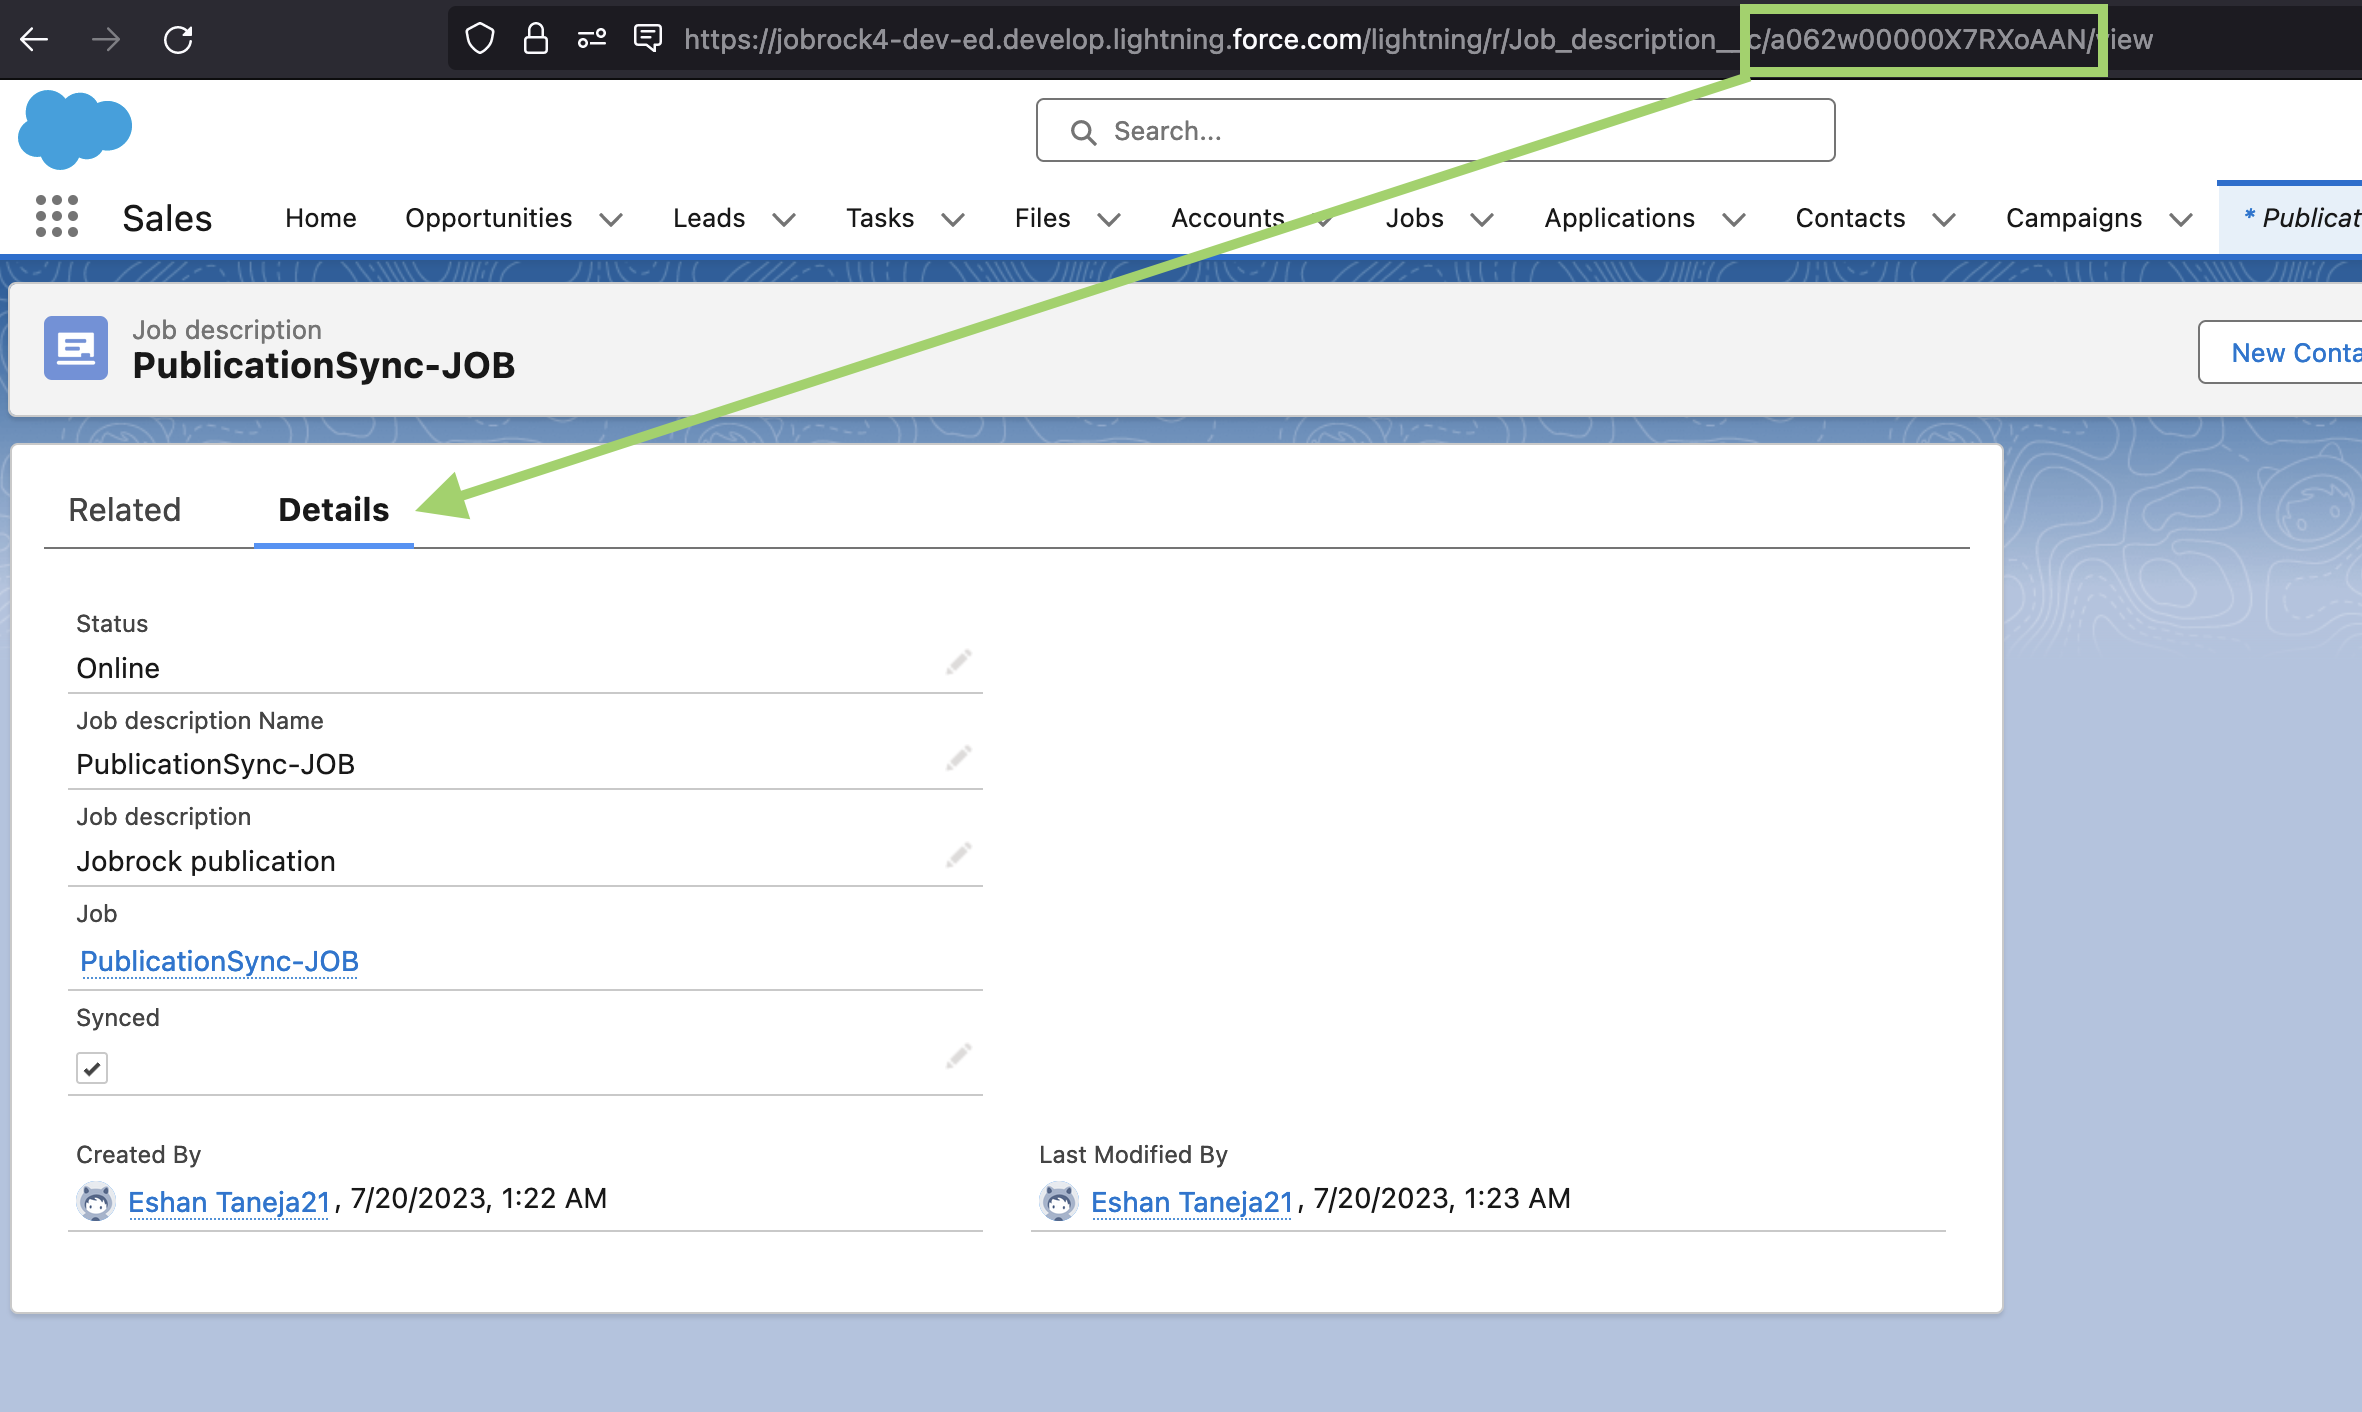
Step 8: Verify synced publications
If a publication is created in Jobrock, it should be visible alongside the associated jobs in Salesforce, and vice versa if the publication is created in Salesforce and synced back to Jobrock.
Navigate to Salesforce and open any job record. Then, copy the publication ID from Step 4 in the URL slug and press "Enter." The publication you have recently created should be displayed on the screen.
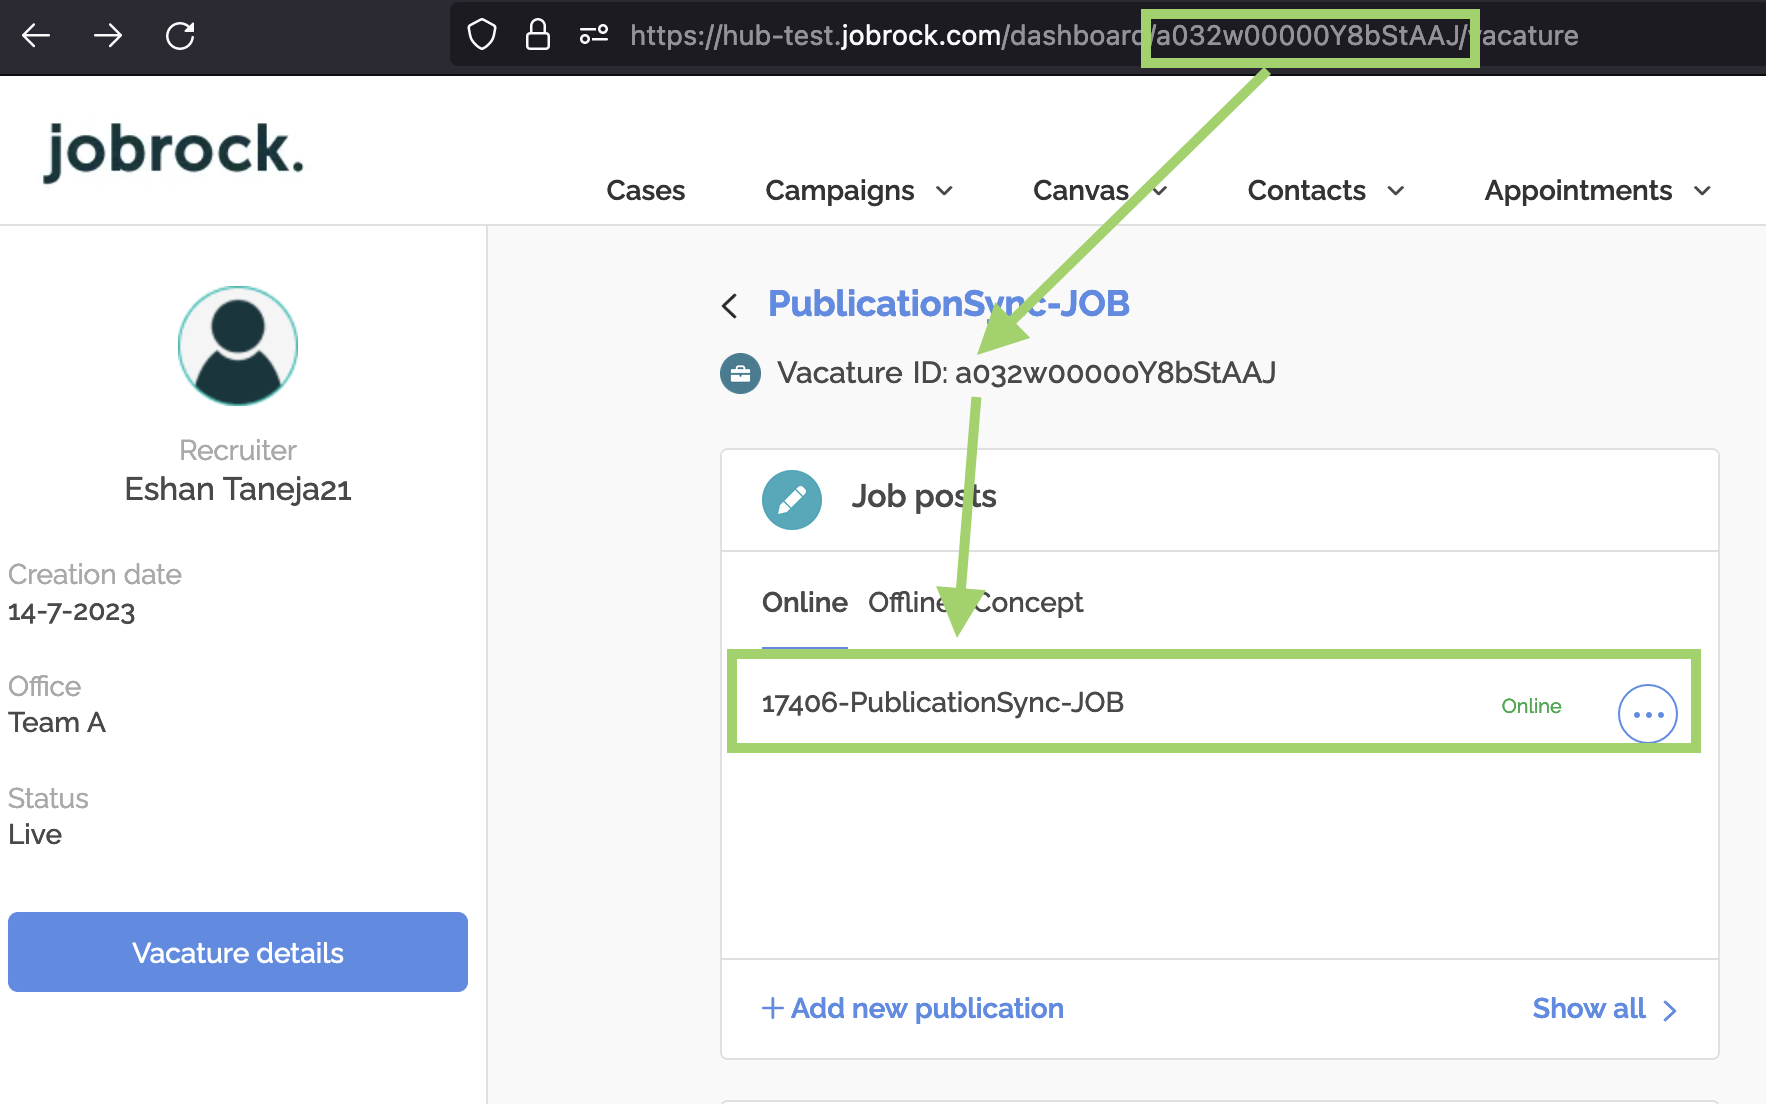
Step 9: Check the publication visibility in the Hub
Confirm that synced publications are visible in the respective hub environment. If a publication is synced from Salesforce to Jobrock, it should appear in the Jobrock hub for that specific job.
Navigate to Jobrock and open any job record. Then, copy the vacancy ID from Step 4 in the URL slug and press "Enter." The publication you have recently created should be displayed on the screen.
Step 10: Verify the sync direction by making a change
Make a change to the publication, such as updating the body text, and check if the change request is correctly pushed to either Salesforce or Jobrock, depending on where the publication content is edited.
Visit https://hub.jobrock.com/loggingRequest?objectType=Publication and ensure that the modification you made is accurately displayed in the request log. Click on the text under "Stack Trace" to verify if the change is reflected there as well.
To ensure the change in the publication is displayed, hover over the field below "Object Details." You can also copy the response to your clipboard for a more in-depth review and verification.
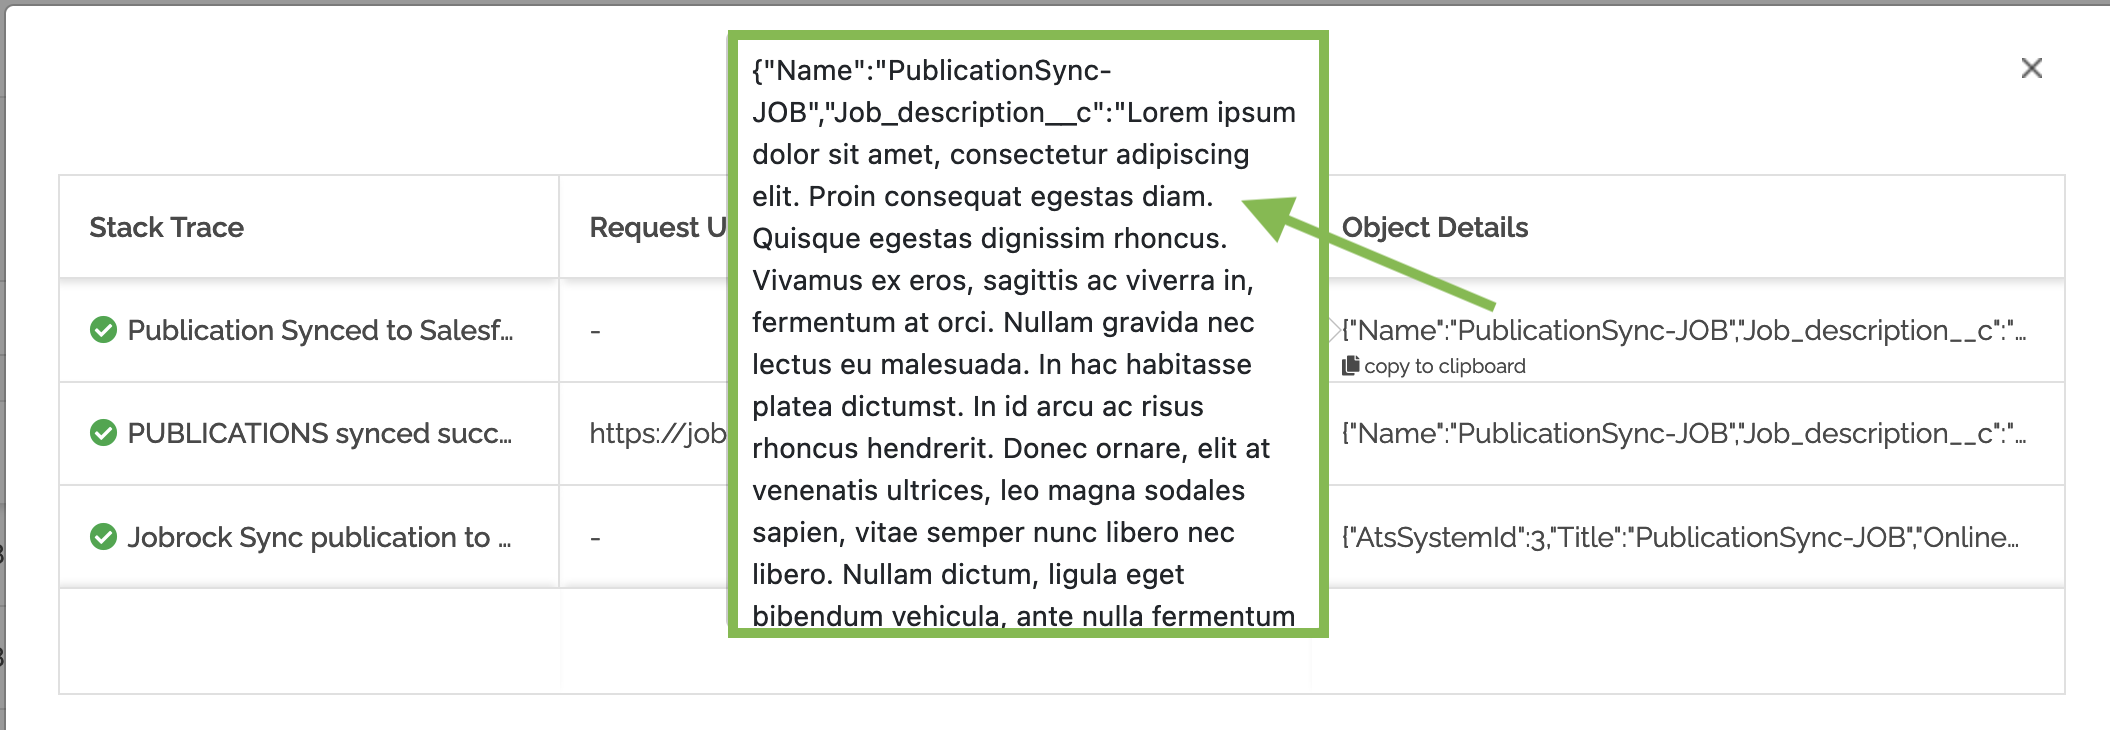
Next, validate the modification in Salesforce by refreshing the publication page mentioned in Step 8. Confirm that the change is displayed accurately. For instance, in this case, the job description was successfully altered and synchronized to SF.

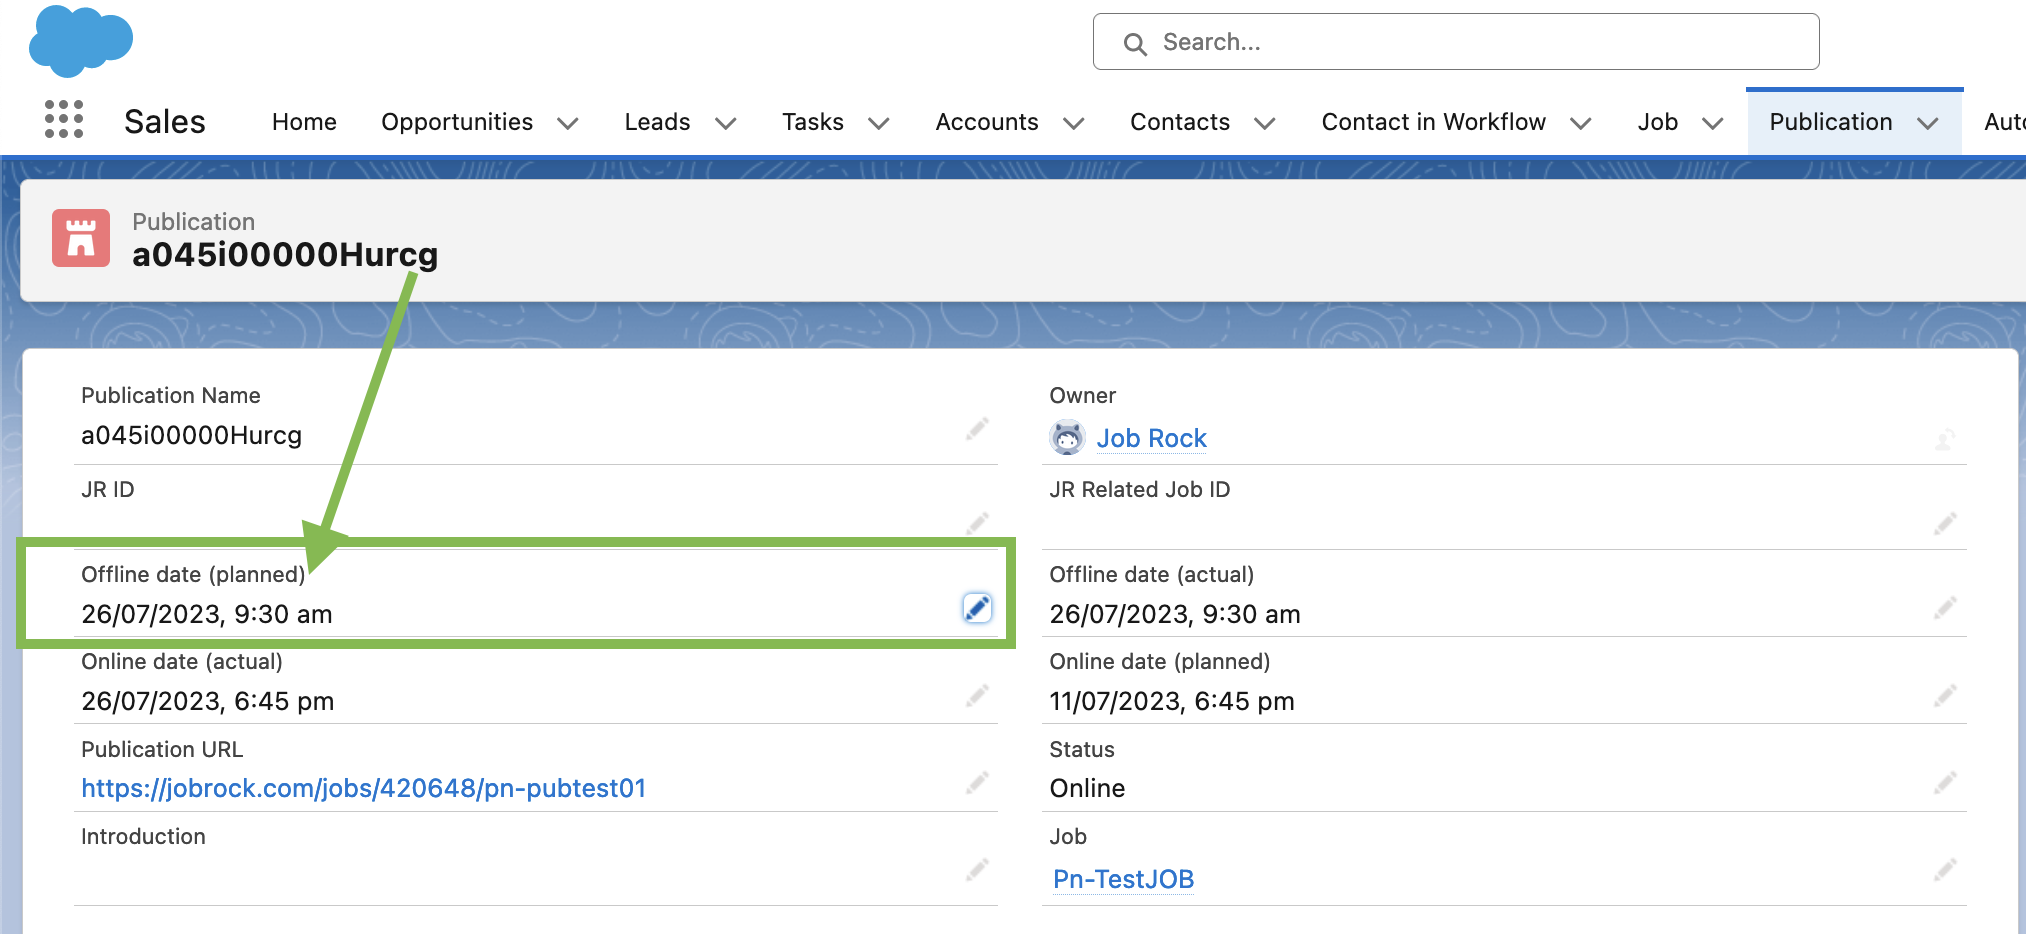
Step 11: Verify the status change
Take a publication offline in Salesforce and verify if the status change is synced to Jobrock. Find your publication in Salesforce and change the set the 'Offline date (planned)' to the nearest timeslot in the future. Salesforce should take the publication offline at that moment, which means that also the publication status will be changed to Offline.
Next, verify in the logs if the request to take the publication offline is processed correctly in Jobrock via: https://hub.jobrock.com/loggingRequest?objectType=Publication.
If you have completed all the steps successfully, you're all set!